Глючит или не запускается Banners of Ruin? Решение есть! Постоянные лаги и зависания — не проблема! После установки мода Banners of Ruin начала глючить или НПС не реагируют на завершение задания? И на этот вопрос найдется ответ! На этой странице вы сможете найти решение для любых известных проблем с игрой и обсудить их на форуме.

Игра не запускается
Игра вылетает на рабочий стол без ошибок.
О: Скорее всего проблема в поврежденных файлах игры. В подобном случае рекомендуется переустановить игру, предварительно скопировав все сохранения. В случае если игра загружалась из официального магазина за сохранность прогресса можно не переживать.
Banners of Ruin не работает на консоли.
О: Обновите ПО до актуальной версии, а так же проверьте стабильность подключения к интернету. Если полное обновление прошивки консоли и самой игры не решило проблему, то стоит заново загрузить игру, предварительно удалив с диска.
Ошибка 0xc000007b.

О: Есть два пути решения.
Первый — полная переустановка игры. В ряде случаев это устраняет проблему.
Второй состоит из двух этапов:
Ошибка 0xc0000142.

О: Чаще всего данная ошибка возникает из-за наличия кириллицы (русских букв) в одном из путей, по которым игра хранит свои файлы. Это может быть имя пользователя или сама папка в которой находится игра. Решением будет установка игры в другую папку, название которой написано английскими буквами или смена имени пользователя.
Ошибка 0xc0000906.

О: Данная ошибка связана с блокировкой одного или нескольких файлов игры антивирусом или “Защитником Windows”. Для её устранения необходимо добавить всю папку игры в исключени. Для каждого антивируса эта процедура индивидуально и следует обратиться к его справочной системе. Стоит отметить, что вы делаете это на свой страх и риск. Все мы любим репаки, но если вас часто мучает данная ошибка — стоит задуматься о покупке игр. Пусть даже и по скидкам, о которых можно узнать из новостей на нашем сайте.
Отсутствует msvcp 140.dll/msvcp 120.dll/msvcp 110.dll/msvcp 100.dll
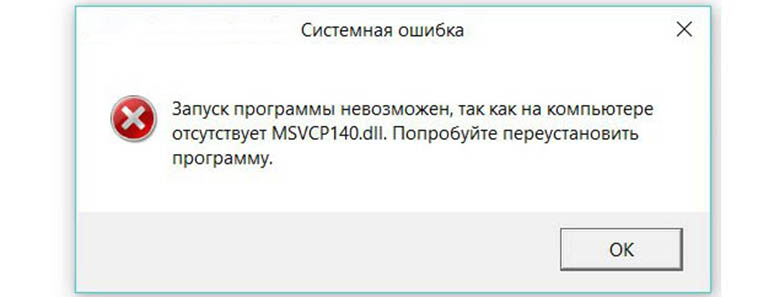
О: Ошибка возникает в случае отсутствия на компьютере корректной версии пакета Microsoft Visual C++, в который и входит msvcp 140.dll (и подобные ему). Решением будет установка нужной версии пакета.
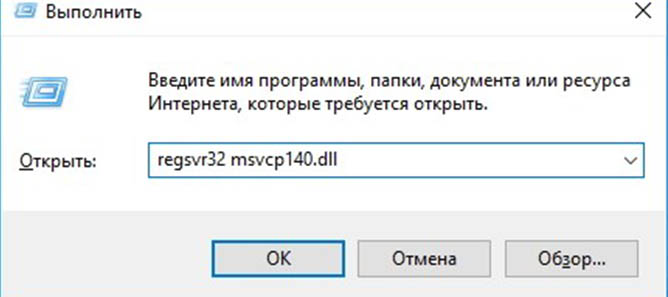
После загрузки и установки нового пакета ошибка должна пропасть. Если сообщение об отсутствии msvcp 140.dll (120, 110, 100) сохраняется необходимо сделать следующее:
Ошибка 0xc0000009a/0xc0000009b/0xc0000009f и другие
О: Все ошибки начинающиеся с индекса 0xc0000009 (например 0xc0000009a, где на месте “а” может находиться любая буква или цифра) можно отнести к одному семейству. Подобные ошибки являются следствием проблем с оперативной памятью или файлом подкачки.


Размер файла подкачки должен быть кратен 1024. Объём зависит от свободного места на выбранном локальном диске. Рекомендуем установить его равным объему ОЗУ.
Если ошибка 0xc0000009а сохранилась, необходимо проверить вашу оперативную память. Для этого нужно воспользоваться функциями таких программ как MemTest86, Acronis, Everest.
Игра тормозит и лагает
Скорее всего данная проблема носит аппаратный характер. Проверьте системные требования игры и установите корректные настройки качества графики. Подробнее об оптимизации игры можно почитать на форуме. Также загляните в раздел файлов, где найдутся программы для оптимизации Banners of Ruin для работы на слабых ПК. Ниже рассмотрены исключительные случаи.
Появились тормоза в игре.
О: Проверьте компьютер на вирусы, отключите лишние фоновые процессы и неиспользуемые программы в диспетчере задач. Также стоит проверить состояние жесткого диска с помощью специализированных программ по типу Hard Drive Inspector. Проверьте температуру процессора и видеокарты —возможно пришла пора обслужить ваш компьютер.
Долгие загрузки в игре.
О: Проверьте состояние своего жесткого диска. Рекомендуется удалить лишние моды — они могут сильно влиять на продолжительность загрузок. Проверьте настройки антивируса и обязательно установите в нём “игровой режим” или его аналог.
Banners of Ruin лагает.
О: Причинами периодических тормозов (фризов или лагов) в Banners of Ruin могут быть запущенные в фоновом режиме приложения. Особое внимание следует уделить программам вроде Discord и Skype. Если лаги есть и в других играх, то рекомендуем проверить состояние жесткого диска — скорее всего пришла пора заменить его.
Проблемы с модами
Ошибки загрузки/обновления
Проверьте стабильность подключения к интернету, а также скорость загрузки. При слишком высоком пинге или низкой пропускной способности обновление может выдавать ошибки.
Если магазин или лончер Banners of Ruin не завершает обновления или выдает ошибки, то переустановите саму программу. При этом все скачанные вами игры сохранятся.
Запустите проверку целостности данных игры.
Проверьте наличие свободного места на том диске, на котором установлена игра, а также на диске с операционной системой. И в том и в другом случае должно быть свободно места не меньше, чем занимает игра на текущий момент. В идеале всегда иметь запас около 100Гб.
Проверьте настройки антивируса и “Защитника Windows”, а также разрешения в брандмауэре. Вполне возможно они ограничивают подключение к интернету для ряда приложений. Данную проблему можно решить и полной переустановкой магазина или лончера т.к. большинство из них попросит предоставить доступ к интернету в процессе инсталляции.
О специфических ошибках связанных с последними обновлениями можно узнать на форуме игры.
Вопросы по прохождению
Ответы на все вопросы касающиеся прохождения Banners of Ruin можно найти в соответствующих разделах Wiki, а также на нашем форуме. Не стесняйтесь задавать вопросы и делиться своими советами и решениями.
Война зверей. Обзор Banners of Ruin
Всем привет, дорогие друзья!
Бывают проекты, которые с первого взгляда наводят на мысль, что люди, их реализующие, вкладывают в дело часть души. Эта игра из таких. Не смотря на то, что разработчиков всего три человека, получается, на мой взгляд, весьма хорошо.
Проект заявлен для платформ: Windows, Linux, Mac OS.
Две группы животных не поделили между собой власть. Соответственно, в результате борьбы, одна из этих групп к власти пришла. Мы играем за другую группу и нам предстоит обеспечить торжество «справедливости». Сюжет на данный момент практически отсутствует.
По мере прокачки (в рамках сессии) существа овладевают талантами, картами действий, которые выпадают рандомно. Огромное значение играет экипировка, видов которой пока не так много.

За победу в сражении начисляют золото, опыт и дают на выбор карту для усиления вариативности действий отряда.
Рассмотрим плюсы и минусы игры, подведем итоги.
+ Очень красивая графика.
+ Хорошее звуковое и музыкальное сопровождение.
+ Любителям челленджа думаю понравится. Бои бывают очень неравные и очень суровые, при этом их можно довести до победы.
+ Многообразная система карт, пассивных умений, экипировки.
+ Разработчики активно пилят игру, прислушиваются к пожеланиям.
+ Прекрасная русская локализация текста.
ТО, ЧТО МОЖЕТ БЫТЬ КАК ПЛЮСОМ ТАК И МИНУСОМ:
— Некоторые карты, экипировка слишком имбовые или работающие не очень логично. Например, некоторая превосходная броня по факту хуже обычной такой же.
— Ближе к концу игры враги становятся намного толще наших героев. При этом наши возможности по убиению возрастают не так сильно. Это все еще играбельно, но, ощущение, как будто взвод разрозненных новобранцев идет на роту закаленных в боях ветеранов.
По сумме впечатлений рекомендую проект как к добавлению в список желаемого, так и к ознакомлению.
PS: Вероятно не раскрыл всех аспектов, мог что-то упустить. Буду рад дополнить/поправить обзор или ответить на вопросы по ходу общения в комментариях.
last update Saturday, August 29, 2020
Report problems with download to [email protected]
In order to unpack this file after download, please enter the following password: trainer.
This is a promo version of a trainer, which means that for free you can only activate one of the available functions. In order to access the rest of this trainer’s functions, you will need to purchase its premium version at cheathappens.com and download its full version.
Activating this trainer
Press F1 at main menu.
Listen for ‘Trainer Activated’.
Press desired hotkey. All hotkeys can be changed on the trainer.
Promo option:
NumPad6: Super Speed
Premium options
NumPad1: Infinite Health
NumPad2: One Hit Kills
NumPad3: Unlimited Stamina
NumPad4: Unlimited Will
NumPad5: Change Florens
NumPad6: Super Speed
Editor Options
Primary Card Damage
Secondary Card Damage
Mute Hotkeys
To temporarily disable the Hotkeys, press CTRL-H after trainer is activated. You can use CTRL-H to re-activate the Hotkeys as well. You can also mute specific hotkeys by changing the hotkey you want to mute to ‘NONE’.
VR Mode
Click on the VR MODE button. Trainer options will now be drawn as buttons. Activate the trainer as usual with your keyboard. Put your HTC Vive on and when you are ingame press the MENU button on the hand controllers to open the steam overlay. At the bottom you can click on the DESKTOP button and you can easily press options on the trainer with your hand controller now.
As of now the oculus has no unique input device and uses keyboard or xbox controller. Both are support by the trainer already.
Note: The cheats and tricks listed above may not necessarily work with your copy of the game. This is due to the fact that they generally work with a specific version of the game and after updating it or choosing another language they may (although do not have to) stop working or even malfunction.
Extra care should be taken with modifications, trainers, and other things that were not created by the game’s developers. In this case the possibility of malfunctioning or even damaging the game, which may necessitate reinstalling the game, is particularly high.
Banners of ruin читы


First, I want to start by saying this is the first guide I have written. I love deckbuilding games (both digital and tabletop), and I am really stoked about this wave of deckbuilder roguelikes that includes Monster Train, Gordian Quest, and now Banners of Ruin.
Also, as a point of order, I will be capitalizing any term that refers to a game concept or mechanic for clarity.
As in other deckbuilder games, you start Banners of Ruin with a deck of cards that is relatively weak. You face multiple battles over the course of a run, and after each battle you can choose to add a new card to your deck that will hopefully make it more powerful.
Cards have costs which are color coded and marked on each card. The number in yellow on top corresponds to the Stamina cost, and the number in blue below corresponds to the Will cost. Each hero has a limited pool of Stamina and Will that determines which cards can be played at any given time. Stamina is refreshed each turn, but Will is only refreshed between battles.
Most cards (Skills) can be played by any hero who has the requisite Stamina and Will to spend. Some cards (Talents and Weapons) can only be played by a specific hero.
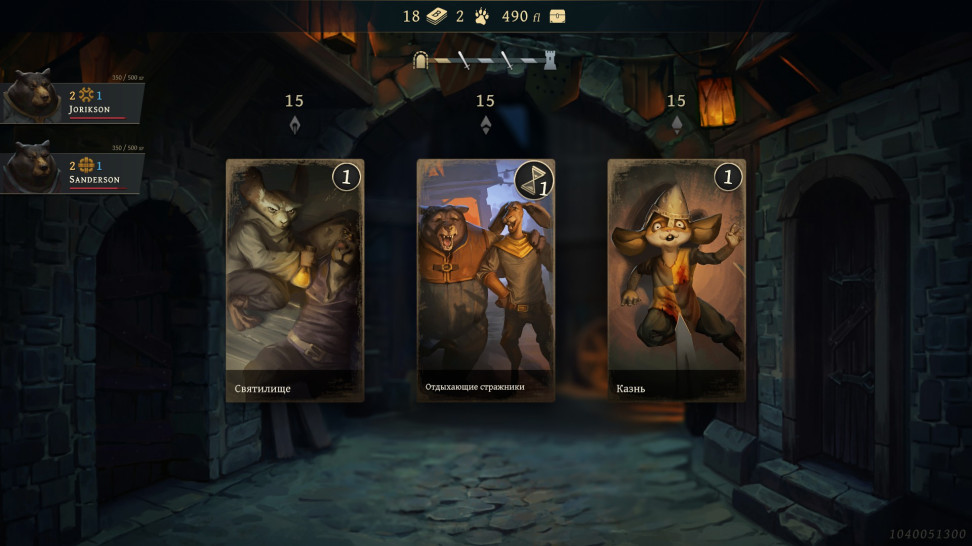
Between battles, you also work your way through three Lanes (decks) of Street cards which represent a path through a city fraught with danger as well as opportunity. Each card in these decks represents an encounter. Some are combat, others allow you to modify your deck. In addition to buying or looting new cards, you can remove or transform weaker cards. There are also opportunities to refill your Vitality (hit points) and enhance your heroes’ abilities.
Three lanes of Street Cards
At the end of each Street, there are three Services to choose from. One allows you to buy cards from a large selection, one allows you to recruit new heroes, and the last allows you to heal your party to prepare for the next challenge. Until you have the right number of heroes, you will likely be selecting the Tavern to recruit new party members. I have not yet found another way to add party members.
Services available near the end of each Street
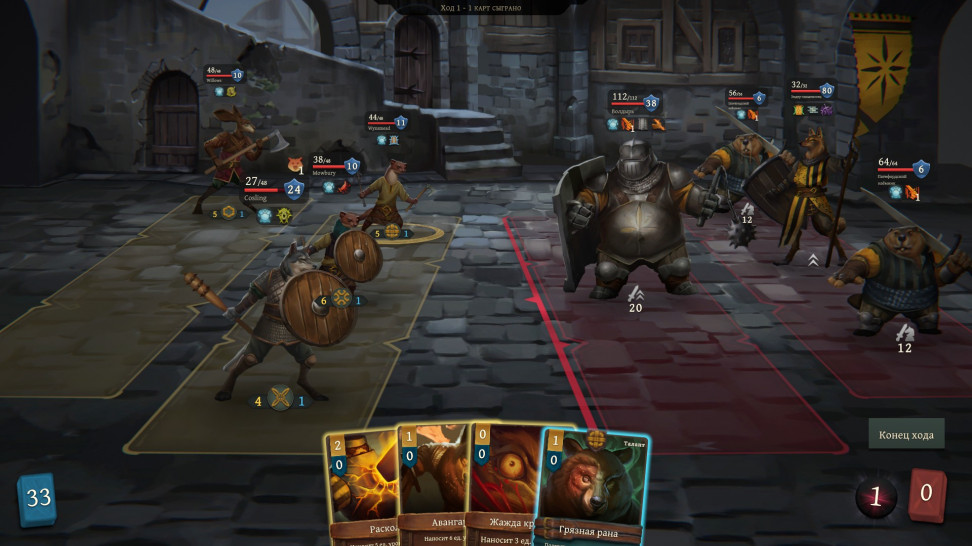
The meat of the game is spent in combat on a 4×3 grid split into Ranks (vertical) and Lanes (horizontal). Two Ranks belong to the player, and two belong to the enemies. Positioning your heroes on this grid affects how enemies can target your heroes as well as how certain cards work. Some cards deal extra damage when played by a hero in the front Rank, or trigger based on how many heroes are in the back Rank, for instance.
The combat grid: 4 Ranks, 3 Lanes
The positioning of your enemies determines the order in which they take their turns. You have an important advantage over the enemy in that your heroes can each play cards every turn, but the enemy only takes turns one Rank at a time. This is a critical mechanic to note, and there will be more on this in the section on combat.
In order to prevail in increasingly difficult encounters, you will need to build a deck that leverages synergy between card mechanics as well as status effects (buffs/debuffs). You will also need to know how to apply the cards effectively in each battle. I would categorize these into the strategic (deckbuilding) element and the tactical (card play) element. Each of these concepts will be covered in the subsequent sections.
Starting Equipment
Your heroes will begin the game with lackluster equipment. One hero will have a Longsword and Light Armor, the other will have a Hatchet, Round Shield, and Medium Armor.
Some combat encounters will include new equipment to choose from as a reward, as will Weapon Cache cards found on the Street.
Weapons serve two purposes. First, they add a damage card to your deck that can only be played by the hero who has the weapon equipped. This is denoted by a symbol at the top of the card that corresponds to the symbol under your hero on the battle grid, and also the symbol in the party screen and formation tool.
This Halberd is equipped by the Mouse in the back row and can not be played by another hero
Second, they determine each hero’s Weapon Damage, which is used by certain Skill and Talent cards to calculate that card’s base damage. The Skill cards may not be hero-specific like weapons and Talents, but some are much better when played by a hero who has a certain Weapon type equipped.
Flurry is a Skill card that deals Weapon Damage and triggers a bonus effect if the hero playing the card has a Weapon equipped in each hand
If your hero equips two one-handed Weapons, Weapon Damage will be based on the Weapon in their Primary Weapon slot. The offhand damage is not added.
Some weapons are strictly better than other weapons. Some weapons fulfill a specific role (like Billhook used for crowd control, more on this later). Generally speaking, you will want higher Weapon Damage (12 is a common number). But your optimal weapon choice will really depend on your deck build, Talents, and Hero Passives.
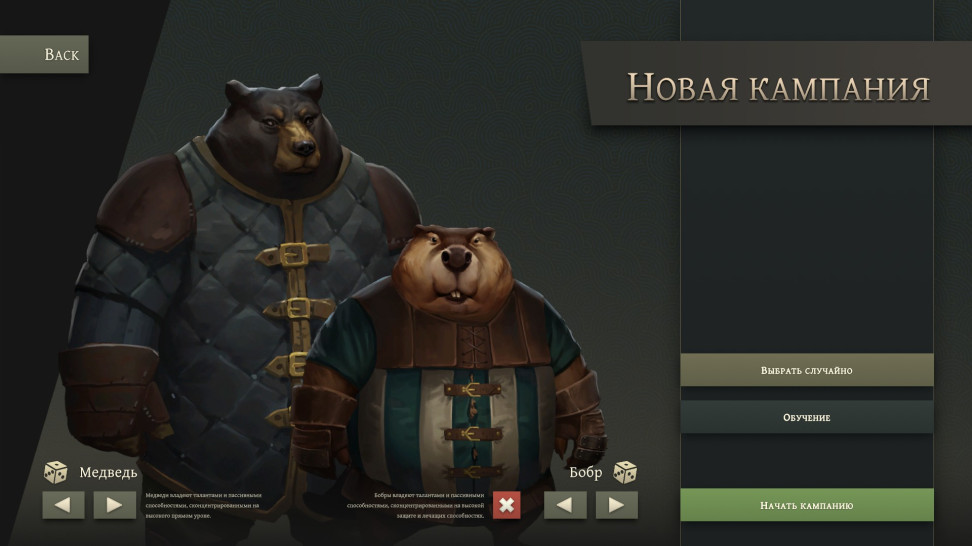
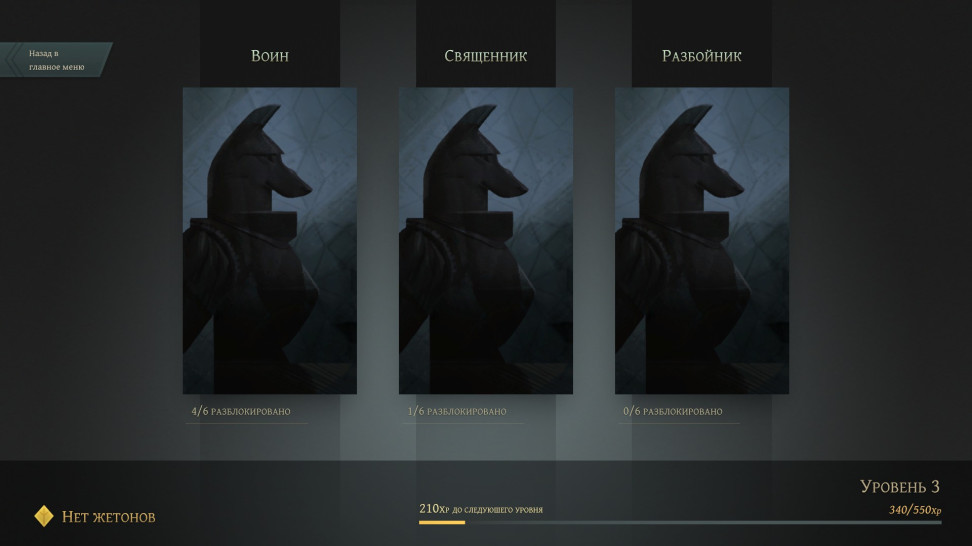
Races
As mentioned in the introduction, there are six different hero Races (or species): Mouse, Bear, Wolf, Weasel, Beaver, and Hare. Each has a unique ability which can be played at any time for 1 Will. There are also Race-specific Talents and Passive Abilities which add to the differentiation between the given critter types.
The Weasel Racial ability spawns 3 Concealed Blades to your hand for 1 Will
Leveling Up
The leveling system in Banners of Ruin is not unlike other roleplaying games. As your heroes vanquish foes, they will earn experience points and eventually advance to the next level, until they hit the maximum level which is 8.
Each time a hero advances in level, you can choose to add a point of Stamina or a point of Will to their pool. This will be usable in the next battle. Remember, Stamina replenishes each round and is used for the majority of cards you might play. Will is not replenished until you face a new encounter and is used to play a few key cards. I prefer to advance Stamina to 4 before investing in additional Will, and how much Will I add (for some heroes, none) really depends on how the deck is built and which cards I want that hero to play and which Racial Abilities I want to emphasize.
Jorikson the Mouse has reached level 2 and can choose to train Stamina or Will
At alternating levels, you will also get to choose either a new Talent or a new Passive ability. Talents add a hero-specific card to your deck and Passives add a persistent effect of some sort. Many Passives make Guard more effective, greatly improving your hero’s chances of survival. Other Passive abilities trigger additional effects from every attack made by the hero. Most of these are better explained in the context of a specific deck archetype, so I will come back to this later.
Talent and Passive ability options from leveling
Enemy Formation
In each battle, you will face between 3 and 6 enemies, arranged in various formations. There are not spatial limitations on incoming or outgoing attacks. The enemy doesn’t need to be in the same or adjacent Lane as its target, and melee weapons can reach from one back Rank to the other. Some cards like Greatsword target all enemies in a Rank, or others can hit both enemies in a Lane. Therefore these can be more or less effective based on the enemy formation. Similarly, certain cards like Deep Strike are stronger when targeting an enemy in a specific Rank.
The primary consequence of enemy positioning is their turn order. As noted in the introduction, the player has an advantage over the enemy in that heroes can all act in every turn, while enemies take alternating turns based on their Rank. The front Rank goes first, followed by the back Rank and so on. The active Rank is highlighted with a red bracket pointing toward the players.
However, this applies only if there are enemies in both Ranks. So, if all the enemies are in a single Rank, the player can slow them down by pushing or pulling one enemy into the inactive Rank. This serves as crowd control and technically can be kept up for multiple turns in a row, bouncing an enemy back and forth (if you have that many cards that move enemies).
Pushing an enemy to the inactive Rank in order to delay their turn using Battering Ram
Pulling an enemy with Billhook to make them miss another turn
A final note on enemy positions: status effects will not resolve on enemies in the inactive Rank. This means that effects like Overwhelm, which is removed at the beginning of the enemy’s turn, can actually last an extra turn when played on a target in the inactive Rank. It can also be extended indefinitely by pushing and pulling the enemy. The flip side of this is that damage-over-time (DoT) effects also will not resolve until the enemy can take its turn.
Player Positioning
As stated above, there are not spatial limitations on attacks. Your dagger-wielding Mouse can reach all the way to the enemy’s back Rank, from the bottom Lane all the way to the top. Generally speaking, there is no advantage to having a hero in the center Lane versus the top or bottom. However, certain cards like Vanguard and Battle Tempo are more powerful when played from the front Rank. Likewise, certain cards like Reserves are optimal if you have heroes in the back Rank.
Another important aspect of player positioning is how the heroes are oriented with respect to one another. Some cards are more powerful when certain heroes are adjacent to one another (Double Team), or others like Coordination will trigger something from the hero in the back Rank only to the hero directly in front of them.
Certain enemy attacks will target everyone in the front Rank (unless all heroes are in the back Rank). Other enemy attacks will target both heroes in a Lane. So, it can be beneficial to stagger your formation as much as possible. Changing your formation can be done from the party screen by clicking the Combat Positions button near the top center of the screen. Click it, and a grid with symbols corresponding to your heroes will be visible. Drag the symbols to change your starting formation. Your heroes will return to this formation at the start of each battle, even if they have moved during the last battle. You don’t have to come back and reset positions every time.
Formation tool
One Passive ability that deserves mentioning here is Bastion, which only works when a hero is alone in a Rank. It’s a really powerful ability that can turn pretty much any hero into a competent tank, but it effectively limits your party size to 4 (3 in one Rank and 1 in the other). Not that that’s a terrible thing. Leaving empty space on your side allows you to evade enemy attacks completely by using movement cards. There will be more on this the next section.
The standard formation for a party with a Bastion tank is three heroes in the back Rank and the tank in the front. This maximizes the card draw potential of Reserves while shielding the back row from sweep attacks which target the front Rank preferentially. However, this is by no means the only option. I have been successful with as few as two heroes and as many as six (the maximum). I will cover player positioning for a couple of deck archetypes later.
Protect Yourself At All Times
Before I dive into the details here, I want to take a step back and say that this game is about surviving. Not just one battle, but many. One after another, each more difficult than before. So, it’s critically important that you protect your heroes’ Vitality bars. There are ways to recover Vitality, both cards that can be played in battle as well as Street encounters. But they are few, and I guarantee they won’t come when you need them most.
How? Well, your first line of defense is to wear armor. The armor you are wearing will give you a starting damage shield which I will refer to as Guard. In the game, it’s represented by a blue shield symbol. It might be called something official, but I must have missed it. On cards, it’s pretty much always a blue shield and a number.
Examining armor choices from the spoils of battle.
There are Stamina penalties for wearing heavy armor (and bonuses from light armor), so you will need to make trade-offs in the early game between defense and offensive capability. I typically don’t use heavier armor until a hero will have at least 3 Stamina left after the Winded penalty is applied. Once your heroes have invested more points in Stamina, the penalties will make less of a difference.
In addition to the starting Guard from your armor, your starting deck has several cards that add to your hero’s Guard ticks. These give you a way to continue mitigating damage as the battle progresses. Certain Passive abilities (like Bastion and Steadfast) will continuously add Guard each turn. These are essential to a hero’s long-term health and well-being, especially if you plan on that hero being a meat shield (it’s recommended to bring at least one meat shield).
As a rule, you should prioritize defense over offense, especially in the first 2-3 turns. In the screenshot below, my Bear could put a serious hurting on the whole enemy team with his Greatsword, or he could leave the enemy Mouse with a fatal wound from Sharpened Steel, but either of those plays will result in him taking Vitality damage. By playing Solid Footing instead, both of my heroes Vitality bars are safe, and I can start softening up one enemy with my Mouse’s remaining Stamina.
First protec. Then attac.
As you progress in the game, you are going to want to pick up a good number of Skill cards that add Guard (Tight Formation, Double Team, Protection), as well as picking Passives (Bastion, Steadfast) and Talents (Fortress) on tanks that will continuously add Guard each turn. You need to be able to recover Guard in order to bounce back from damage spikes in later battles. Impervious is a passive that I often take even on non-tank heroes because it amplifies any source of Guard (+5 stacks every time you gain Guard).
This is another important advantage the player has, and you are going to want to use it. In this case, both Hares are targeting my Bear, and the enemy Mouse is eyeing my Mouse. My Mouse has plenty of Guard to start with because he is wearing Medium armor. My Bear is just wearing pajamas apparently and needs to get his sword between himself and the enemy to avoid being struck.
Evading Attacks
If you have left empty spaces in your formation (or it’s early in the game and you only have 2 heroes anyway), it’s possible to avoid attacks completely. Your starting deck will have one Withdraw in it, and if you’re holding it at the right time, it can save your heroes in spectacular fashion. In the below example, all three enemies targeted my Bear in the top Lane, but I’ve successfully evaded the attacks by moving to the bottom Lane using Withdraw.
Evasion gets harder to pull off later in the game once you have four or more heroes. Melee attacks target the front Rank first, but if the space in the front Rank is empty, the attack will target the back Rank instead. In order for an attack to miss completely, both Ranks of the targeted Lane must be empty. With 5 or 6 heroes, it’s actually impossible to evade an attack entirely.
That said, movement cards can still can save your bacon in late game. Rather than avoiding the attack completely, you can re-position a meat shield with a fresh stack of Guard to absorb an attack instead of a wounded or otherwise squishy party member.
Now I’m Ready to Strike
Once you have protected your heroes to the best of your ability, you will want to use your remaining Stamina (and sometimes Will) to dish out as much punishment as possible to the squishiest and/or most threatening enemy. At the beginning, this will be the poor Mouse militia as they usually present the same threat as the Hares but with a smaller Vitality bar.
Yeah, maybe we should save the Bear with heavy armor and a shield for last
AoE/sweep attacks are good for applying status effects, but you are going to want to focus on single targets rather than try to take down a bunch of enemies in one shot. If you can finish off one enemy and get some bonus damage on others, that’s great.
Damage Types
There are three ways to damage enemies. Two are damage-over-time (DoT) effects, and the other is direct damage. One effective way to apply direct damage is build up a nice stack of Charge on a hero and then unleash a Multistrike attack. The starting cards you can use to do this are Momentum and Rush. They aren’t great, even when stacked with the Charge effect from Hatchet. But then again, your starting enemies are pretty weak too.
Early game Multistrike combo
If you build your deck to stack Charge effectively *cough* Warcry *cough* while also applying Vulnerable and Overwhelm to your target, your Multistrikes can be truly devastating.
One thing to note, some cards like Akimbo can grant additional attacks. Although this sounds similar to Multistrike, it doesn’t actually work the same. Your Charge stacks will apply only to the first attack. These cards tend to be based upon your weapon damage (much higher base than the Multistrike abilities), and this can make up for the multiplication you would otherwise get from a Multistrike.
Rondel Dagger and Estoc synergize with Charge as their attacks are Multistrike. Cards that grant additional attacks like Akimbo do not synergize with Charge
The DoT effects are Bleed and Poison, and there are a couple of important differences between them. Bleed does 1 point of damage per stack at the beginning of the turn and then 1 stack is removed. Poison, on the other hand, does 1 point of damage per stack then then adds a tick. However, Poison can be mitigated by Guard and Bleed bypasses it (much to the chagrin of heavily armored heroes).
This Bear can’t save himself with Guard stacks, he is going to bleed out this turn regardless
Those Poison stacks will get them. Eventually.
OK, I admit that when I said there are only three damage types, I lied. There is a fourth way to damage enemies, with the Crippled effect. An Crippled enemy will take 1 damage for every stack of Crippled any time it moves. The way to make this work is by first applying stacks of Crippled to an enemy, then forcing that enemy to move (or certain enemies will move on their own). In my opinion, this is just too much work. You need to have a lot of cards that apply Crippled and a lot of cards that move enemies. As stated in the section on formation, moving enemies around is beneficial on its own, and splashing in the Crippled debuff doesn’t hurt, especially when it comes for free with Bleed effects (ie the Halberd).
Note: if you are experienced with deckbuilding games, a lot of this will be review for you. Feel free to skip this section if you wish.
Deck Size and Card Draw
Any game that involves a deck of cards has an element of chance. The probability of drawing a given card is directly proportional to the number of copies of that card in the deck and inversely proportional to the total number of cards in the deck (i.e. the number of cards that are NOT that card). Furthermore, the larger the deck is, the more variability there can be from hand to hand. In general, smaller decks are more consistent than larger decks, which is why games like Magic: the Gathering have a minimum deck size that is virtually never exceeded in competitive play.
Cards that draw more cards effectively make the deck «smaller» by cycling through it faster, making it more consistent as well as giving the player more options to address a given situation. Having a small deck with a lot of card draw means that you will have more opportunities to play your most powerful cards.
In Banners of Ruin specifically, drawing more cards into each hand is essential to being able to actually utilize all the resources (Stamina and Will) at your disposal, especially with a party of four or more heroes. Hence, cards that draw extra cards are indispensable. These include Quick Hands, Second Wind, Reserves, Sadist’s Cunning, Nefarious, Bloodlust and and a few others.
Be quick or be dead
There is a mechanic in late-game that punishes you for having a lot of card draw. I will cover how to deal with this when I get to the deck archetypes. However, if you don’t build a deck that also has a viable damage source, then you will have trouble eliminating the enemies that pose this threat. So, while card draw is important, it is not sufficient.
Certain Street encounters allow you to remove cards. Blackfoot Stash allows you to remove one card from your deck. Over-Encumbered allows you to remove two Skills or one Talent (maybe that you picked up on an otherwise good recruit). Crazy Weasel is magical, especially in the early game when you don’t have a lot of cards in your deck. You can remove a card AND replace it with a better card in one shot.
After you have unloaded Guard and Strike, you will want to take out cards that don’t fit with your deck theme. Rush is really weak if you don’t have good sources of Charge (or an effect like Bleed that you want to stack with successive hits). Withdraw is good, but it costs 1 Will and you may prefer to rely on Guard rather than evasion. If so, Rotate allows you to swap your freshly Guarded heroes with vulnerable ones without the Will cost.
One final point: you do not ever HAVE to add a card to your deck. Often the best choice will be to not add a card at all.
Token upgrades
Patch 0.37.9 introduced a mechanic to upgrade cards. As far as I can tell, these come from specific Street encounters and not as post-battle loot. If you find an Upgrade Token, you can apply it to any card in your deck (whether it’s a Skill, Weapon, or Talent) to change it.
Upgrading Withdraw to remove the Will cost. Now it can be played any number of times in a single battle for only 1 Stamina.
Some Tokens reduce the cost of a card, others add an additional effect. Some increase the cost in exchange for a particularly powerful effect.
Typically, you will want to upgrade cards that you use often, and you will want to match upgrades that synergize with the effect on the card. For instance, Warcry already grants Charge, and upgrading it grant additional Charge effectively multiplies its effect. Wild Brawl affects an entire Rank, so adding a status effect like Vulnerable or Overwhelm will also multiply its impact more than on a single target attack.
Card combinations are a common aspect of CCGs and other deckbuilding games. Certain cards may appear really weak on their own, but when combined another card, or maybe two additional cards, they can become ridiculously powerful. In Banners of Ruin, the addition of Passive abilities and equipment on each hero adds combo potential as well.
As an illustration, I’ll use my favorite card, Battle Tempo. It is a Talent, which means you probably won’t ever get more than two or three copies into your deck as you can only pick one up when a hero levels up. It costs 2 Stamina, and it either grants 5 Guard or becomes a 1×5 Multistrike attack, depending on where the hero is positioned. Pretty underwhelming on its own.
Well, like I said in the Offense section, Multistrike is good when combined with Charge, which adds flat damage to each strike. Such a combo comes stock in your starting deck in the form of Momentum + Rush. Rush is a 1×3 Multistrike that costs 1 Stamina. Momentum allows you to discard a card in your hand and add 3 ticks of Charge to the hero who plays it. Together, they combine for 4×3=12 damage for 1 Stamina and a discarded card. Still meh. For 2 stamina, you can deal 8 damage plus 4 Bleed for 12 total using a single Sharpened Steel, and you don’t have to ditch a card to do it.
But if somehow you could get say 10 stacks of Charge onto a hero before you played Rush, then you’re talking 30+ damage. That could one-shot some of the early enemies or take a good chunk of Vitality along with all the Guard off mid-level enemies. One way to do this is to avoid attacking with one hero while you slowly build up Charge over multiple turns. Well, that’s fine but you’d probably do better to just chip away at the enemy turn after turn rather than save up all the damage for a finishing blow. You need a way to get Charge fast.
Enter my other favorite card, Warcry. Warcry adds the hero’s Weapon Damage to her ticks of Charge in one shot. Voila, here are your 10+ stacks. All of the sudden, Rush becomes decent. Warcry does cost 2 Stamina, but this can be cut to effectively 1 stamina if it’s preceded by Second Wind. Second Wind draws a card and grants the hero Vigour, which refunds the Stamina cost of the next card the hero plays.
Battle Tempo is a souped up version of Rush. It multiplies a hero’s Charge ticks by 5 instead of 3, but only when the hero plays it from the front Rank. This is where the movement part of Warcry synergizes perfectly. If for some reason the hero you want to unleash hell upon your foe is frothing at the mouth in the back Rank, Warcry moves him to the front so he can exorcise his inner demons in a violent fashion. If he is already standing in front, you can still play Warcry without moving him. If you line it up with a Second Wind that refunds the Stamina cost of one of the cards, the hero needs a Stamina pool of 3 to execute the combo.
Deck Archetypes
One thing I appreciate about Banners of Ruin (in contrast to say Monster Train) is that you actually don’t have to commit completely to one combo (or flavor of combo) in order to succeed. The combos that are leveraged in one deck archetype can be sprinkled into a deck of another archetype and still be effective. So, you should not feel obligated to remain faithful to a single theme. Even if you are building for direct damage, there is no reason not to pick up a Poison passive if there aren’t any better options.
Part of why I started writing this guide was in response to discussion threads saying that Charge is too weak, so I have dedicated the last section to my preferred archetype which (ab)uses the Charge and Multistrike mechanics. That said, I will give detailed explanations of two other deck archetypes I have built and which cleared the game successfully.
Archetype #1: Poison Turtle (DoT)
This is an archetype that a lot of players have noted works well. Your goal is to get stacks of Poison on all the enemies and weather their damage until they all succumb to a slow, agonizing death. The must-have card is Miasma, which applies a tick of Poison on a random enemy every time you draw a card. If you can also pick up a few other Poison abilities, this will hasten the demise of your enemies.
Critical Components: Miasma (Talent), card draw Skills and Talents (Quick Hands, Setup, Reserves, Born Leader), and Guard generation (Bastion, Steadfast, Protection etc).
Other Synergies: Poison-related Skills and/or Passives (Toxic, Plagued, Pestilent)
Optimal Formation: Bastion Tank in Front rank, 3 heroes in back Rank. It can also work with 5 or 6 heroes, but you need to build everyone pretty tanky.
Critical Weakness: Bleed effects, especially the enemy Overwatch Passive. If you haven’t gotten this far yet, I don’t want to spoil it completely. Make sure you also pick up some cards that remove Bleed (Field Dressing, Strange Mist) or get Unholy on one of your heroes and use that hero to draw all the cards. You’ll see why.
Archetype #2: Colossal Smashers (Direct Damage)
This archetype is built around the idea that the best offense is a good defense, as long as you have some way to turn defense into offense. The namesake card Colossal Smash does exactly that. It deals damage to an enemy based on how many ticks of Guard are on the hero playing it. However, it also removes all the Guard from that hero, leaving them defenseless (at least for a moment). To deal with this, you need to make sure you have a way to restore Guard to the Colossal Smasher. The best one is actually a type of armor called Hidden Plates, which rebounds your Guard back up to 35 if you end a turn with 0 Guard.
Protection allows you to build up ridiculous stacks of Guard by adding the Guard of your neighbors to your own. It’s especially effective when played from the center Lane.
You can designate a backup Colossal Smasher to the back row behind 3 tanks in the front row and then it doesn’t really matter that you shed all your Guard to kill one enemy. If that Smasher also has the Bastion passive, even better.
Critical Components: Colossal Smash (Skill), Protection (Skill), Hidden Plates (Armor) or Bastion (Passive) on a hero in the back Rank
Other Synergies: Tight Formation (Skill), Rearguard (Skill), Double Team (Skill), False Opening (Talent)
Optimal Formation: 3 Tanks in front Rank (for maximal exploitation of Protection), one Bastion tank in back
Critical Weakness: Bleed effects, but at least you can focus down the enemies that present this threat pretty quickly. Misplays are more often the cause of failure with this deck, i.e. you smashed one enemy but forgot to leave yourself any Stamina to build up Guard stacks. Or the Rearguard you decided to play from the back Rank gave 6 Guard to your Hidden Plates hero, now he is facing 30 damage that should have been prevented. Not that I’ve ever made that exact mistake.
My Deck of Choice
As I’ve stated throughout this guide, combining Multistrike and Charge is a very good way to produce direct damage. To illustrate this point, I’ll walk through a battle with The Warden, the boss at the end of the 3rd Street.
Some basic info about the deck build to match the previous section:
Formation: 6 Heroes if you can keep them alive through mid-game. Front Rank a bit tankier than the back Rank.
Critical Weakness: Carapace/Retaliate which can be avoided with a single ranged weapon user. You do rely on card draw which makes Overwatch a threat, but you can melt the Crossbow Hares’ faces off before they get a chance to activate it.
Squaring off with The Warden
Here is my opening hand as I face The Warden in the final fight. Right off the bat, I see that my center lane Bear, who has full HP and is in no danger of dying, is going to take enough damage to wipe out her starting Guard and trigger Rage from her Bad-Tempered Passive ability. This will double her damage next round, so I opt not to play Protection on her. Instead, I focus one of the back row Halberdiers down as far as I can.
Now it’s my turn again, and the Bear is angry. In addition to Rage, which doubles her damage, she has 15 stacks of Charge from various cards I played in Turn 1 (Pincer, Momentum, Coordination, etc). Charge is added BEFORE Rage doubles the total, so she is is about to unload (12+15)x2 = 54 damage on each enemy in the back rank. Although Rage isn’t the central theme of my deck, I took a few abilities and cards that produce it because it synergizes with Charge.
One Halberdier was was brutally slain. The 2nd Halberdier is now wounded and defenseless. This is why you don’t mess with the Bear.
The Warden took considerably reduced damage because of his annoying Passive, Champion, which negates any damage beyond 25 and actually adds the excess damage as extra Guard. You might think the only solution to this would be DoTs, which tick away a little bit of Vitality every turn. But I have another solution, and it involves my 2 favorite cards.
Note the Mouse in the back row. He currently has no buffs aside from Vigour, which he got from a Reserves I played in a previous turn (card draw is essential). I have drawn Warcry, and I am also holding Battle Tempo (with his symbol on it). Time for him to step up.
I have now played Warcry, moving him into the front rank, which means Battle Tempo becomes a Multistrike attack card (1×5). The combo with Warcry means each of those 1’s now has his weapon damage (12) added to it. The Warden has been my main target since Halberdier #2 went down, and he has no Guard left. He also has several stacks of Vulnerability and 2 stacks of Overwhelm, which came from a Warhammer strike in a previous turn. The Overwhelm stack didn’t clear because I played it while the back rank was inactive. Vulnerability adds 25% extra damage, and each stack of Overwhelm adds another 25%. So, right now, the boss will take 75% increased damage. Each hit is 13×1.75, which is just under the 25 damage threshold. That means he is about to get deleted.
The ghost of the Warden cries, «2 cards and 2 debuffs? That’s what did me in?»
OK, before I get to this last example, I want to show you how Olegaunt the Hare is built with the Ardent Passive ability.
He dual wields Estocs for their high multistrike damage (basically an upgraded Rush), which is the best way to leverage the stacks of Charge that Ardent builds whenever you draw an extra card. Card draw is a must-have for this deck build, even more so than for others, and Ardent synergizes with it perfectly. He even has Sadist’s Cunning for good measure.
Back to the boss fight.
Olegaunt the Hare has been sitting in my back Rank for the past few turns building up 46 stacks of Charge (meaning I’ve drawn 23 extra cards since he last attacked), and now finally I have drawn one of his Estocs. It’s time to cut this Wolf knight up.
That Wolf thought he was sitting pretty with his 75 Guard and full HP bar, but now he is limping and ready for the coup de grace. The almost 190 damage from the bunny was not quite enough to take him down. But I have 3 damage cards and plenty of Stamina left, so it’s over for him.
You may have noticed that I have Miasma on the Beaver and Toxic on my Mice. When I started this run, I wasn’t actually trying to prove a point, I just happened to read comments saying «poison is the only way to win» in the middle of it, and that’s what sparked me to write this guide in the first place. True to my previous advice, there was no reason not to pick up a couple of Poison abilities. I have cleared the game several times since then with the Oath that makes enemies impervious to Poison.
Bleed
Prior to 0.37.9, I had commonly splashed Bleed into Charge/Multistrike decks because the extra damage doesn’t hurt, and Arterial Rupture is pretty amazing when the hero playing it has a fat stack of Charge even with less than 10 stacks of Bleed.
With the addition of the Weasel Racial Ability (spawn 3 Concealed Blades), the Brutality mechanic, and several cards (especially Terrible Wound), I tend to lean on the damage ticks of Bleed to finish off enemies pretty often. It’s definitely more effective now than at launch, to the point that I believe it could be a successful archetype. I haven’t yet nailed down all the critical pieces to the level of detail in the above examples.
Ruin
There have been gradual additions to the pool of Ruin cards since launch that have made it much more viable. I’ve been able to clear the game by leveraging the insane direct damage made possible by, for instance, Wretched Assault. In order to get full exploitation of the damage cards, you typically want to focus on stacking Overwhelm and Vulnerable on the priority targets. Charge is nice to have but not necessary. Many Ruin cards also synergize with Bleed.
However, playing Ruin successfully requires a higher level of tactical expertise (which cards to play on whom and when) because many of the cards open you up to damage yourself. It was a great way to get the «Survive a battle with only 3 total HP left in your party» achievement.
Oathkeeper + Instinct
Oathkeeper is a Wolf Talent and it wrecks shop. Keep your deck lean, grab Instinct to keep retrieving and playing it as many times as possible per battle, and it will become a one-card death sentence for everything but the toughest enemies. I recently finished a run with a single Wolf and farmed it up to over 150 damage.
158 damage in one shot.
You do need to have other ways to kill the Warden as you can’t do more than 25 damage in one shot to him.
The fact that the Weasels can also dance around building Guard from Agile and Charge from Strategy is super fun as well. If you want to build a movement-focused deck, I recommend not more than three Heroes, otherwise it gets very hard to evade attacks
While the crowd control from moving enemies is powerful, the damage I get from Crippled is not as great as other potential sources. This is just my own experience, and I’d be thrilled to see someone else describe a deck archetype that fully leverages Crippled damage.
Much like the game itself, this guide is still incomplete. I am aware that there are several mechanics that I didn’t bother to explain, and this was partially intentional (I am sure I also left some things out unintentionally too). Still, it ended up being a lot longer and more in-depth than I originally planned. I do plan to come back and update the guide when Banners of Ruin leaves Early Access.
My goal with this guide was to help players who are frustrated by the learning curve to the point that the game isn’t fun for them. I am a veteran deck builder (I started playing MTG Limited formats more than two decades ago), and this game did kick my ass in my first couple runs.
I don’t claim to have mastered this or any other deckbuilder game, and there is still plenty I can learn from other players.
Thanks for reading and please leave constructive comments!