Barotrauma консольные команды
Как включить консоль?
Просто нажмите F3, чтобы открыть и закрыть консоль.
Команды консоли Barotrauma — редактор подводных лодок
alpha 161: установить альфа-прозрачность
color 55 79 149: для установки значений RGB
load [submarine name]: чтобы загрузить подводную лодку.
multiplylights [R,G,B,A]: для умножения цветов и альфа-каналов
reloadsprite: перезагрузить спрайты
resetall: сбросить все элементы и структуры
resetentitiesbyidentifier [identifier]: для сброса элементов и структур с идентификатором
resetselected: сбросить выбранные элементы и структуры
save [submarine name]: чтобы сохранить текущую субмарину.
setentityproperties [property name] [value]: для установки свойств элементов и структур
Команды консоли Кампании
campaigndestination [index]: для установки целевого местоположения
campaigninfo: текущая информация о кампании
setlocationreputation [value]: установить репутацию
togglecampaignteleport: возможность телепортироваться двойным щелчком
pause: приостановить игру (только для одиночной игры)
Команды консоли Баротравмы — Модерация
ban [character name]: запретить персонажа
banendpoint [IP Address/SteamID]: запретить ip или steam id
banid [clientID]: заблокировать идентификатор клиента
clientlist: Список игроков
givecommandperm [clientID/SteamID/character name/IP Address]: разрешение на использование консольных команд
giveperm [clientID/SteamID/character name/IP Address]: для предоставления разрешений
giverank [clientID/SteamID/character name/IP Address]: для присвоения ранга
kick [character name]: чтобы выгнать персонажа
kickid [clientID]: удалить идентификатор
killdisconnecttimer [seconds]: игроки-разъединители умирают через [секунды]
mute [character name]: чтобы отключить звук персонажа
resetkarma [clientID]: сбросить карму
revokecommandperm [clientID/SteamID/character name/IP Address]: удаляет разрешение игрока на использование консольных команд.
revokeperm [clientID/SteamID/character name/IP Address]: для удаления разрешений
setkarma [clientID] 54: установить карму
showkarma: показать карму
showperm [clientID/SteamID/character name/IP Address]: для отображения разрешений
togglecharacternames: показывает имена над игроками
togglekarma: переключает карму
togglekarmatestmode: переключает режим проверки кармы
unban [character name]: разблокировать персонажа
unbanip [IP Address]: разблокировать ip
unmute [character name]: включить звук персонажа
Команды консоли Barotrauma — Настройки сервера
autorestart [true/false]: включает таймер автоперезапуска
autorestartinterval [seconds]: задержка между раундами
autorestart timer [seconds]: значение таймера
botcount 11: количество ботов
botspawnmode [fill/normal]: режим появления ботов
difficulty 36: устанавливает сложность
startwhenclientsready [true/false]: включает таймер автозапуска, когда игроки готовы
Barotrauma читы
Команды консоли Barotrauma — Отладка
В игре
netstats: Статистика сети
simulatedduplicateschance [0.00-1.00]: имитирует дублирование пакетов в сетевых сообщениях.
simulatedlatency [min. latency (seconds)] [rand. latency (seconds)]: имитирует задержку в сетевых сообщениях.
simulatedloss [0.00-1.00]: имитирует потерю пакетов в сетевых сообщениях.
steamnetdebug: Включает Steamworks
Barotrauma Wiki
This wiki is currently outdated in places. For recent updates, check out the new official Barotrauma wiki, hosted by developers at https://barotraumagame.com/wiki!
Enabling Mods on a Dedicated Server
As of the Alpha 0.9.9.0 release, the way mods get activated was changed. This guide assumes that you have a working Barotrauma dedicated server, with access either via RDP/FTP and some kind of text file editor.
Contents
Procedure [ ]
To enable mods on a dedicated server, you will need to subscribe to the mods you wish to use on your own client (your PC) then copy the files to your server and enable them in the config_player.xml. This method is simple and does not rely on SteamCMD mod subscription.
Enabling Mods on Client [ ]
Go the the Steam Workshop and subscribe to the mods you wish to use. Make sure that Steam has finished downloading the mods and then launch/relaunch Barotrauma.
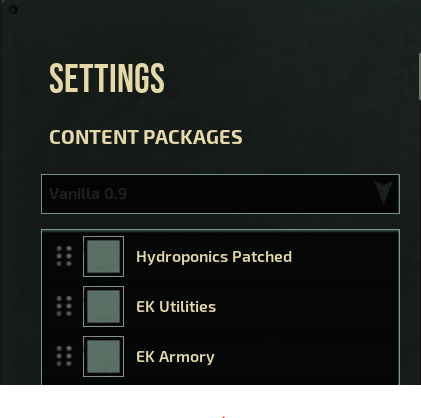
From the main menu go to settings, then under content packages, enable each of the mods you wish to use on your server. Some mods may require a game restart so do this before moving on to the next step.
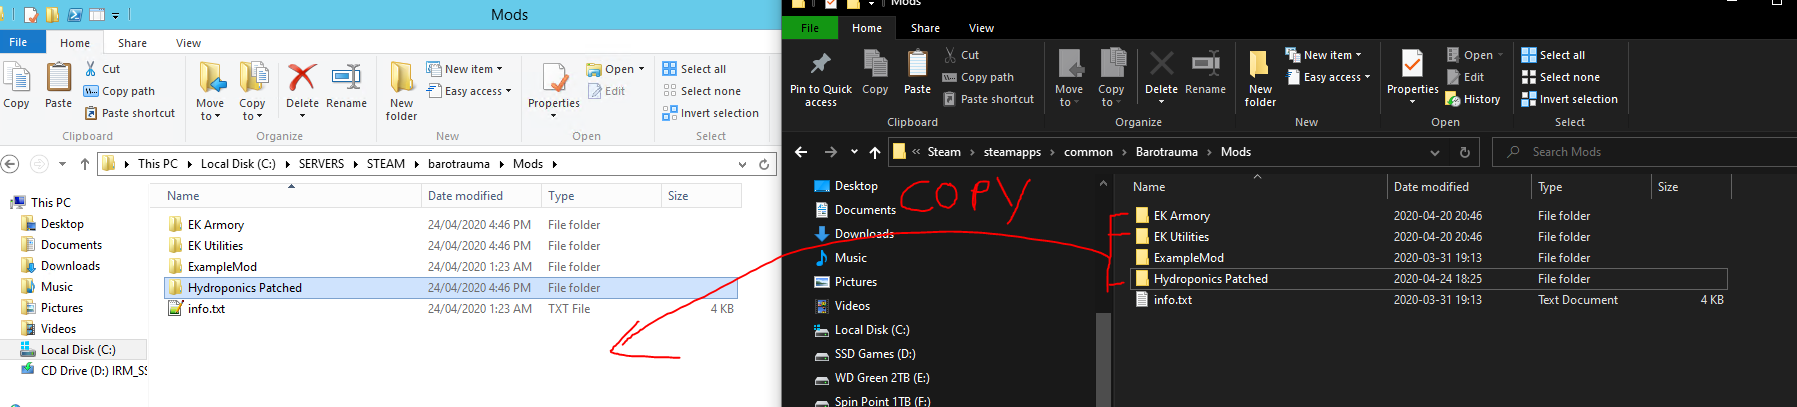
Navigate and Copy the Mod Folders [ ]
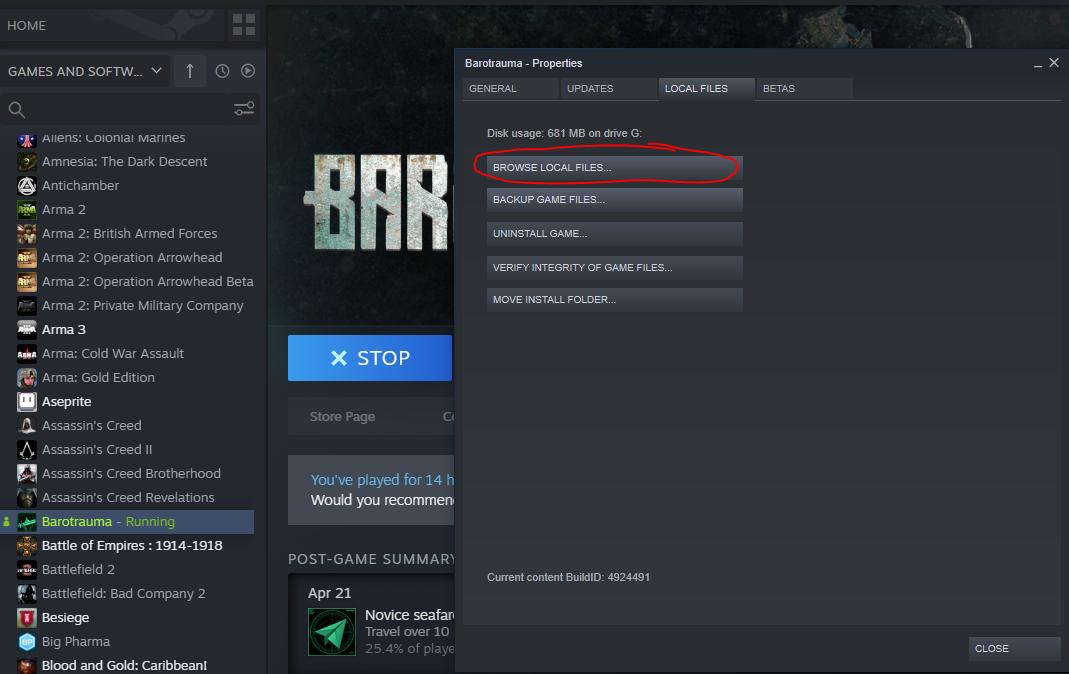
You will need to copy the mods you wish to have activated to your dedicated server Barotrauma\Mods directory, via RDP/FTP/SMB etc. depending on your server setup.
Enabling the Mods on the Server [ ]
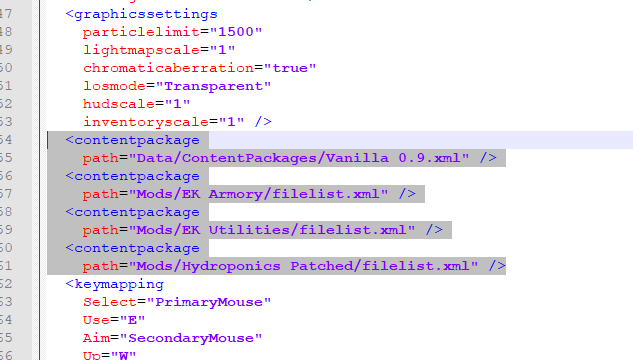
Now that the mod files have been copied to the server, navigate back to Barotrauma’s root game directory on your PC. Open the file config_player.xml with your favorite text editor (Notepad/NP++/Sublime).
Scroll until you find the line:
You should see a entry for the vanilla game and one for each mod that is currently enabled. On the server, in the games root directory, open the config_player.xml and copy the relevant entries across.
Run the server with the executable (windows) or shell script (nix).
Barotrauma как включить моды


Все файлы расположены в обычной директуре Steam, как на Маке, так и на Виндовсах, их легко найти через локальные файлы библиотеки.
Ну или говоря по-человечески:
Возвращаясь к редакции, и кастомизации. Я не хочу вдаваться в подробности каждого из файлов, с каждой функцией, поскольку покрывать чересчур много (однако если потом будет время, может я вернусь к этому).
Едем далее, мне надоел банальный английский язык в игре (или русский), я хочу что-то более уникальное, что-то смешное, что-то глупое.
Найдите более реалистичный звук сонара в интернете, или хоть стоны девушки, сделайте тоже самое что в предыдущей ступени, и наслаждайтесь новым хорошим звуком.
Дружно открываем данную папку, и убираем фотки что нас достали, ставим новые, пишем тоже название, сохраняем формат, и они очень красиво впишутся в фон. Также если устали от однообразных или глупых названий городов на карте Баротравмы, там же и текстовые файлы, где можно эти названия преспокойно поменять.
:
— Always
— OnPicked
— OnUse
— OnSecondaryUse
— OnWearing
— OnContaining
— OnContained
— OnNotContained
— OnActive
— OnFailure
— OnBroken
— OnFire
— InWater
— NotInWater
— OnImpact
— OnEating
— OnDeath = OnBroken
— OnDamaged
— OnSevered
— OnProduceSpawned
— OnOpen
— OnClose
:
— This
— Parent
— Character
— Contained
— NearbyCharacters
— NearbyItems
— UseTarget
— Hull
— Limb
— AllLimbs
Названия тэгов Dyno в Дискорде Баротравмы:
wiki, warn, structurehp, statuseffect, savedata, regex, neutralballast, naturalformation, idlock, idcard, guides, greenwall, editorholders, editorcontainer, editorautofill, edc, conditional, coalition, clown, buildtoday, bugreport, brokenpump, ballastflora, RegEx
Ипользуйте «?tag название» чтобы показать тэг.
Также, если вам понравился этот гайд, прошу не счесть за трудность его оценить, поскольку это будет мне крайне приятной поддержкой.
Barotrauma как включить моды


We want to make Barotrauma as modder-friendly as we can. To that end, the game comes with a couple of editors, and we have separate, more in-depth guides for the Submarine and Character editors.
This guide you’re reading now is intended to cover what happens outside the editors. We hope you find it helpful, and we’d be happy to hear what you think should be added to it in the future!
Content packages are essentially files that tell the game which content files to use and where they are located. This includes items, structures, monsters, random events, level generation parameters, jobs and so on. By default the game uses a content package called “Vanilla 0.9”, which you can find in Content/Data/ContentPackages/Vanilla 0.9.xml. Any other content package can be considered a modification of the game content, that is, a «mod».
Note that if you just want to publish a custom submarine in the workshop, you don’t need to worry about content packages – you can just select the submarine from the «Publish item» tab in the Workshop menu, and the game automatically creates a folder and content package for your mod.
If you use the built-in character editor for creating a new character, you will have to select or create a content package for it. You cannot use the vanilla content package, because modifying the vanilla content package would make your game incompatible with the other players.
When playing in multiplayer mode, the players generally need to have the same mods installed as the server, or they will be unable to join. However, this does not apply to all types of content: for example, the clients can use mods that modify the UI or sounds without causing incompatibility with servers. See the «Content types» section for more info on which types of content cause compatibility issues.
This mod would simply add an extra item to the game (or items if there are multiple ones configured in the potatogun.xml file).
Most mods are usually not core content packages, but instead add things to or modify things in the Vanilla content package (= the default content of the game).
Core packages are packages that contain all the necessary files to make the game run, instead of just adding some extra files on top of another content package. There can only be one core package selected at a time.
Here’s an example of a simple core package:
Note that the content package should be saved with the file name «filelist.xml» in the Mods folder, in this case «Mods/BestModEver/filelist.xml».
XML files consist of elements, which in Barotrauma’s case could be for example an item. The elements are defined as follows:
An element can also have attributes, which usually give some additional information about the element. For example:
Elements can also have child elements. Barotrauma’s item elements for example have a child element called “Sprite” which determines what the item looks like.
Usually you are not creating a total conversion mod, but you might still want to override parts of the original content. This can be done by using the «override» elements in the xml configuration files.
Overriding is based on identifiers (where applicable), meaning that the identifier of the new item must match the identifier of the old item. If you try to override an item that is not found in the game, you will get an error in the console.
For example, the content of the potatogun.xml file included in the previous content package example could be something like this:
This mod would replace the vanilla «Harpoon Gun» with a «Potato Gun». The behavior of the gun is omitted in the example, but we would probably want to change the texture of the gun. In that case, we would replace the original «Sprite» element with a custom, like so:
In order to get the new item to function like the vanilla counterpart, make sure to include all the tags of the original item. You can add tags, but don’t remove them (unless you really know what you are doing), or the item might not work as it should.
Note that for some content types, like items, you can override multiple definitions by simply adding the override element as the parent of the main element, like this:
In the previous examples the content packages included a couple of different types of content files: items, characters, structures, jobs, random events and the game executable. Here’s the full list of all supported content types. Unfortunately we don’t yet have a full documentation available for modifying all of the content types, but you can use the Vanilla content files as a reference to see how they work; most of them are pretty straight-forward.
Some types of content prevent players from joining servers if both the player and the server don’t have the same content installed, while some can be freely installed without compatibility issues.
The ones that cause multiplayer incompatibility are Jobs, Item, Character, Structure, LocationTypes, MapGenerationParameters, LevelGenerationParameters, Missions, LevelObjectPrefabs, RuinConfig, Outpost, Afflictions and Orders.
Some of the content files are mandatory in core content packages. For example, you cannot have a core content package that does not include any items, characters or a game executable. The required types are Jobs, Item, Character, Structure, Outpost, Text, Executable, ServerExecutable, LocationTypes, MapGenerationParameters, LevelGenerationParameters, RandomEvents, Missions, RuinConfig, Afflictions, UIStyle, EventManagerSettings and Orders.
A submarine file. Even though the game automatically loads all submarine files from the Submarines folder, if you publish a submarine in the Steam workshop, a content package containing only that submarine will be generated to tell the game where to find the submarine file.
The character’s jobs; Captain, Engineer, Mechanic and so on.
An item file that may contain one or more items.
A group of multiple items that may be pre-wired or pre-configured. Item assemblies can be created in the submarine editor.
A character configuration file defines visual things like sounds and particle effects as well as functional things, like how the character acts, how much health does it have, and whether or not it can walk. A character configuration file also contains references to the ragdoll and animation files.
Note that, at least for now, the character configuration file must match the species name. So the character configuration file for a character with the species name «Mygreatcharacter», for example, should be Mygreatcharacter.xml. The species name is used like the identifier for items, so it has to be unique.
A structure configuration file; decorative background walls, solid wall pieces, etc.
An outpost used in the campaign mode. The outposts are technically static, immovable submarines and can be created using the submarine editor.
A file that defines in-game texts, which can be anything from texts you see in the menus to item names, and from error messages to loading screen texts. Mods don’t usually need to define new text files, but if you for example are creating a mod that adds new items and want the item names and descriptions to be translatable to multiple languages, you need to create text files for all the languages you want to support and define the names and descriptions there.
Where the game executable itself is stored. Only for advanced users: this may be useful if you’ve compiled a custom version of the game and want to create a mod that uses the custom executable instead of the normal Barotrauma.exe.
Similar to Executable; defines the path of the dedicated server executable.
Defines the types of locations that can appear on the campaign map (City, Outpost, Military, Research. )
Defines how the campaign map is generated. This includes the size, the amount and placement of locations, how the map looks and the number of difficulty zones, among other things.
Defines how the in-game levels are generated. This includes the size and shape, how the level looks like, the amount of smaller caves and ruins and many other things. You can create and test your own level generation parameters in the in-game level editor which can be accessed using the console command “editlevels”.
Defines the environmental objects such as plants, decorative rock formations, water currents, hydrothermal vents. These can also be edited in the level editor.
Defines the random events that can occur during rounds.
Defines the missions that are available in the campaign and the mission mode.
Defines the decorative, non-interactable background creatures that wander around the levels.
Defines how alien ruins are generated, including their layout, which structures they are made of and how items are laid out inside them.
Defines particle effects such as explosions, fire, splashes, etc. These can be edited using the in-game particle editor which can be accessed using the console command “editparticles”.
Defines decals such as blood spatters, explosion damage and burnt walls.
Defines the random NPC conversations and dialog lines.
Defines afflictions such as blood loss, internal damage, addictions, infections, etc.
Defines the tutorial configurations. Do note that modifying the tutorials or creating your own ones will most likely require changes to the game’s source code and recompiling the game.
Defines UI style files which determine how UI elements look. These can be used to, for example, modify how the in-game menus or device interfaces look.
Items consist of one or more “item components” that determine the functionality of the item. For example, an item could have a “Holdable” component that makes it possible to pick it up and hold it in your hands and an “ItemContainer” component that lets you contain other items inside it.
If you are familiar with Unity, you can think of items as Unity’s GameObjects, and item components as the Components attached to the GameObjects.
In the following sections we will go over all the available item components and their editable properties.
Let’s start with the properties shared by all the item components.