Biome Finder
Last Update: Jul 12, 2020 (MC 1.16)

Drop level.dat anywhere.
How To Use
Requirements
For technical reasons, you need to know the seed of your world to use Biome Finder, unless, of course, you want to find a seed for a new world. If you’re playing SSP, the app is able to fetch the seed from your savegame. Alternatively, you can use the /seed command ingame. In SMP, you can use the same command if you have sufficient rights. Otherwise, however, you’re dependent on the server owner, who started the world and has access to the savegame and config files.
Technical
This app uses some relatively new web technologies. As a result, some features may be disabled for older browsers. I recommend using the latest version of a major browser such as Chrome, Firefox, Edge or Safari.
Usage
Seed Selection
The first thing you should do is select a seed and version. You can either type it in manually, or you can load it from your savegame. The latter can be done by clicking on «Load from Save. « and selecting your level.dat, or by drag&dropping the level.dat file into your browser window. Level.dat is a small file located in the folder of every Minecraft savegame. You can find the savegames in the saves folder of your Minecraft installation. On Windows you can use %appdata%\.minecraft\saves to get to that folder.
Levels allow you to store and reuse seeds on this website, without having to load your savegame every time. When loading a seed from a level, the seed will automatically be stored as a level.
You should also know that a seed is always a number (up to around 20 digits). If you type in anything else (like letters), it will be converted to a number. The app does this the same way Minecraft does, so it’s safe to use letters (and other characters) as well.
Navigation
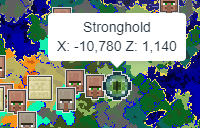
Once you entered your seed and version you can start using the map. To scroll, use your arrow keys while your mouse cursor points at the map, or move your mouse while holding down the left mouse button. You can use the slider below the map or your mousewheel for zooming. The lower inputs allow you to go to a specific point (e.g., your base) of the map and set a marker there. You can always remove and add the marker by double clicking on the map. The «Save Map» button allows you to save the currently shown map as png image file.
Touchscreen
When using a touch-enabled device, an extra option for enabling/disabling touchscreen control will appear below the map. With that option enabled, you can drag the map with your finger to navigate, you can pinch to zoom in and out, and you can tap and hold to set a marker on the map. By double tapping on the map, you can quickly enable/disable the functionality as well.
Credits
Thanks to Earthcomputer for his work on bedrockified, which helped improve support for Bedrock Edition.
Thanks to amidst for providing biome colors.
Chunk Finders
This set of apps allows you to easily view different map features and find points of interest in your minecraft world with just your map seed. Version support varies.
Show only apps for Bedrock Edition
Popular
Overworld
Nether and End
More Apps
Seed Map
An online map viewer that helps you find new Minecraft seeds and locate biomes, structures, slime chunks and other features in your current world.
Last Update: Jun 13, 2021
Spawn Chunks Reader
Spawn Chunks Reader provides a quick and easy way to figure out your world’s spawn chunks and coordinates by submitting your level.dat file.
Last Update: Jul 5, 2020
Seed Finder for Slime Chunks
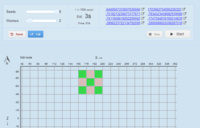
With this Seed Finder App, you can find Minecraft seeds based on where you want to have slime chunks.
Last Update: Nov 14, 2014
Superflat Generator
This app allows you to create your own superflat presets. Every aspect can be customized. Only for PC.
Last Update: Nov 4, 2014
Block Compendium

Not sure which blocks can be set on fire or picked up by endermen? The Block Compendium will answer that and much more, giving you an up-to-date list of all blocks you can use for your next project.
Village Finder
Last Update: Jul 13, 2020 (MC 1.16)
Drop level.dat anywhere.
How To Use
Colors
On supported versions, village locations are colored according to the village type:
Limitations
The app shows more villages than are actually in the game, because villages sometimes fail to generate due to terrain restrictions.
Requirements
For technical reasons, you need to know the seed of your world to use Village Finder, unless, of course, you want to find a seed for a new world. If you’re playing SSP, the app is able to fetch the seed from your savegame. Alternatively, you can use the /seed command ingame. In SMP, you can use the same command if you have sufficient rights. Otherwise, however, you’re dependent on the server owner, who started the world and has access to the savegame and config files.
Technical
This app uses some relatively new web technologies. As a result, some features may be disabled for older browsers. I recommend using the latest version of a major browser such as Chrome, Firefox, Edge or Safari.
Usage
Seed Selection
The first thing you should do is select a seed and version. You can either type it in manually, or you can load it from your savegame. The latter can be done by clicking on «Load from Save. « and selecting your level.dat, or by drag&dropping the level.dat file into your browser window. Level.dat is a small file located in the folder of every Minecraft savegame. You can find the savegames in the saves folder of your Minecraft installation. On Windows you can use %appdata%\.minecraft\saves to get to that folder.
Levels allow you to store and reuse seeds on this website, without having to load your savegame every time. When loading a seed from a level, the seed will automatically be stored as a level.
You should also know that a seed is always a number (up to around 20 digits). If you type in anything else (like letters), it will be converted to a number. The app does this the same way Minecraft does, so it’s safe to use letters (and other characters) as well.
Navigation
Once you entered your seed and version you can start using the map. To scroll, use your arrow keys while your mouse cursor points at the map, or move your mouse while holding down the left mouse button. You can use the slider below the map or your mousewheel for zooming. The lower inputs allow you to go to a specific point (e.g., your base) of the map and set a marker there. You can always remove and add the marker by double clicking on the map. The «Save Map» button allows you to save the currently shown map as png image file.
Touchscreen
When using a touch-enabled device, an extra option for enabling/disabling touchscreen control will appear below the map. With that option enabled, you can drag the map with your finger to navigate, you can pinch to zoom in and out, and you can tap and hold to set a marker on the map. By double tapping on the map, you can quickly enable/disable the functionality as well.
Credits
Thanks to Earthcomputer for his work on bedrockified, which made it possible to support Bedrock Edition.
Related
![]()
Woodland Mansion Finder
Using Woodland Mansion Finder, you can quickly spot Mansions in your Minecraft world on an interactive map.
![]()
Villages
Ever tried to build your own village, but your villagers wouldn’t breed? Or have you tried building an iron golem farm, but the golems wouldn’t spawn? This tutorial will will help you by providing you with everything you need to know about the inner workings of villages.
![]()
Village Info
Village Info is a mod which shows some information about the village you’re currently in. It also tells you if there’s a village nearby.
Seed Map
Last Update: Jun 13, 2021 (MC 1.17)
Drop level.dat anywhere.
How To Use
Limitations
Some features are not 100% accurate, i.e., locations can be wrong or missing. These include:
Various other structures such as villages and igloos can sometimes fail to generate in-game as well.
Let me know in the comments if you find any wrong or missing locations. Please make sure that:
Requirements
For technical reasons, you need to know the seed of your world to use Seed Map, unless, of course, you want to find a seed for a new world. If you’re playing SSP, the app is able to fetch the seed from your savegame. Alternatively, you can use the /seed command ingame. In SMP, you can use the same command if you have sufficient rights. Otherwise, however, you’re dependent on the server owner, who started the world and has access to the savegame and config files.
Browser
This app uses some relatively new web technologies. As a result, some features may be disabled for older browsers. I recommend using the latest version of a major browser such as Chrome, Firefox, Edge or Safari.
Usage
Seed Selection
The first thing you should do is select a seed and version. You can either type it in manually, or you can load it from your savegame. The latter can be done by clicking on «Load from Save. « and selecting your level.dat, or by drag&dropping the level.dat file into your browser window. Level.dat is a small file located in the folder of every Minecraft savegame. You can find the savegames in the saves folder of your Minecraft installation. On Windows you can use %appdata%\.minecraft\saves to get to that folder.
You should also know that a seed is always a number (up to around 20 digits). If you type in anything else (like letters), it will be converted to a number. The app does this the same way Minecraft does, so it’s safe to use letters (and other characters) as well.
Dimension and Feature Selection
Below the seed and version, you can also choose the Minecraft dimension that you want to view (Overworld, Nether or End). This, and the version you use, will affect which features can be enabled. To toggle certain features, click on the icons in the features box just above the map.
You can also expand and collapse features box by clicking the arrow on the right side of the box to show the full names of the features, as well as some more options.
Note that some features will only show if you zoomed in enough. This is to keep the app fast and to not flood it with icons. The app will show a warning and all affected features will be highlighted once that happens.
Navigation
Once you entered all the options you can start using the map. To scroll, use your arrow keys while your mouse cursor points at the map, or move your mouse while holding down the left mouse button. You can use the slider below the map or your mousewheel for zooming. The lower inputs allow you to go to a specific point (e.g., your base) of the map and set a marker there. You can always remove and add the marker by double clicking on the map. The «Save Map» button allows you to save the currently shown map as png image file.
Selecting structure locations
You can click or tap on the icons on the map to see their exact coordinates in the game. For some structures, additional details are shown as well.
Touchscreen
When using a touch-enabled device, an extra option for enabling/disabling touchscreen control will appear below the map. With that option enabled, you can drag the map with your finger to navigate, you can pinch to zoom in and out, and you can tap and hold to set a marker on the map. By double tapping on the map, you can quickly enable/disable the functionality as well.
Slime Finder
Last Update: Dec 21, 2017 (MC 1.12)
Drop level.dat anywhere.
How To Use
Background
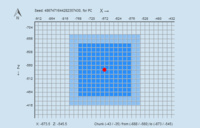
Apart from spawning in swamps (added in 1.4), slimes can only spawn in every 10th chunk in average («Slime Chunks»). Chunks are 16×16 blocks wide (x and z axis) and 256 blocks high (y axis). Slime Chunks are predetermined by your savegame seed, and are always the same for a specific seed, just like the generated terrain. The only way to find Slime Chunks ingame without using third party apps or mods is to observe the slime spawns.
Does Slime Finder work with Bedrock Edition?
Yes! Make sure to select Bedrock as the version.
Does it work in superflat worlds?
No slimes are spawning in my slime chunk!
First of all, even in slime chunks, slimes spawn far less frequently than most other hostiles, maybe comparable to endermen. So make sure you wait long enough. Also, double check the seed you used as well as the coordinates. Here are a few more things to consider:
Also have a look at my Slime Farming Tutorial which explains some details about slime spawning as well.
Requirements
For the reason mentioned above, you need to know the seed of your world to use Slime Finder, unless, of course, you want to find a seed for a new world. If you’re playing SSP, the app is able to fetch the seed from your savegame. Alternatively, you can use the /seed command ingame. In SMP, you can use the same command if you have sufficient rights. Otherwise, however, you’re dependent on the server owner, who started the world and has access to the savegame and config files.
Technical
This app uses some relatively new web technologies. As a result, some features may be disabled for older browsers. I recommend using the latest version of a major browser such as Chrome, Firefox, Edge or Safari.
Usage
Seed Selection
The first thing you should do is select a seed and version. You can either type it in manually, or you can load it from your savegame. The latter can be done by clicking on «Load from Save. « and selecting your level.dat, or by drag&dropping the level.dat file into your browser window. Level.dat is a small file located in the folder of every Minecraft savegame. You can find the savegames in the saves folder of your Minecraft installation. On Windows you can use %appdata%\.minecraft\saves to get to that folder.
Levels allow you to store and reuse seeds on this website, without having to load your savegame every time. When loading a seed from a level, the seed will automatically be stored as a level.
You should also know that a seed is always a number (up to around 20 digits). If you type in anything else (like letters), it will be converted to a number. The app does this the same way Minecraft does, so it’s safe to use letters (and other characters) as well.
Navigation
Once you entered your seed and version you can start using the map. To scroll, use your arrow keys while your mouse cursor points at the map, or move your mouse while holding down the left mouse button. You can use the slider below the map or your mousewheel for zooming. The lower inputs allow you to go to a specific point (e.g., your base) of the map and set a marker there. You can always remove and add the marker by double clicking on the map. The «Save Map» button allows you to save the currently shown map as png image file.
Touchscreen
When using a touch-enabled device, an extra option for enabling/disabling touchscreen control will appear below the map. With that option enabled, you can drag the map with your finger to navigate, you can pinch to zoom in and out, and you can tap and hold to set a marker on the map. By double tapping on the map, you can quickly enable/disable the functionality as well.
Credits
Thanks to @protolambda and @jocopa3 for figuring out the slime chunk algorithm for pocket/bedrock edition, and depressed-pho for porting it to JavaScript.