Game cheats
Patching system is one of the most splendid features of PCSX2. Some patches will help you make the broken game playable by messing with its code skipping some of its parts. You’ll have to discover and download these patches from the Internet. Still there are other patches help you cheat on games while playing. So even if your skill is not enough to beat the game fairly you won’t be frustrated like on the real PS2. All you have to do is to find or better yet create your own cheat for the game. Here goes a small tutorial that can help you understand a bit how does these cheats work and how to create your own cheat.
PCSX2 uses so-called CRC for each game. This CRC is a special control sum of all bytes in the main game executable. It helps to distinguish not only the different games but even the different regions and the different editions of one game. This is a precaution not to apply the patch created for one game version on another making the game unplayable/crashing. The CRC is a 8 chars long hexadecimal number. You can find the number for your game in PCSX2 console when the game is starting (or on the console caption in some PCSX2 versions, it looks like «Game running [CRC=xxxxxxxx]«).
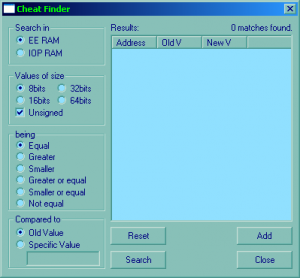
This tutorial will cover the game Resident Evil Code: Veronica X. This is not a simple game to play and it’s quite simple to cheat plus you may need some cheats playing it. The game starts in a prison with only a knife for a weapon. Our first priority will be to make Claire immortal so her condition will steadily be in green. There is a byte or a word (2 bytes) somewhere in the game memory that is responsible for storing the Claire’s condition. Let’s assume this is a byte first. We will need to vary this value to catch it so Claire has to take some damage and find a green herb to be able to restore it. It’s quite easy to take any amount of damage in this game so it won’t be a problem. When you get to the safer place (it may prove harder) press ESC and choose Patch Finder. from the Misc submenu of main GUI menu. The pictured dialog will pop up. The dialog allows us to search through EE RAM and IOP RAM. Assuming the main work is done by EE processor let’s start to search for our condition byte in EE RAM. Every byte has 8 bits and it is the smallest data unit so we will select 8bits size. Let’s assume also that the condition cannot be less than zero (unsigned) although it will not make much difference if we would assume otherwise.

Cheat of patch finder
Currently this dialog holds no data; this is its starting state. As the Claire health must not be equal zero now (or else she would die) let’s select Not Equal, compared to Specific Value and place a zero in the edit box. Let’s hit Search after that. The program will find some 13 million values not equal to zero. That’s good for a start. Let’s hit Close button now and return to game by Run—Execute.
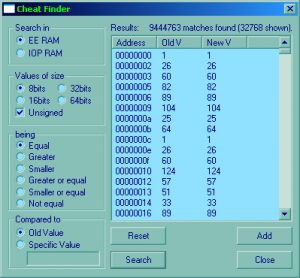
We’ll need to walk around a bit (make a few steps) and press ESC again getting to the patch finder by Misc—Patch finder menu. We can see that the page is still holding our previous search so now we will search in those 13,5 million bytes left (we need to find only one!). There are no changes in Claire condition from the last time so set the options as Equal and Old Value (we’re leaving only those bytes not changed from the previous search). Press Search button again. Now the number of result bytes is decreased by many thousands maybe a million if you’re lucky enough (see Intermediate stage picture).

Let’s enable now our new found cheat to see if it will work. Leave the patch finder dialog and start Patch Browser. from the same Misc menu instead. You will see the only line in the tables which must be our patch (see the picture Patch Browser dialog). Select it and press Enable/Disable button to enable the patch (notice its state has changed).
Patch Browser dialog
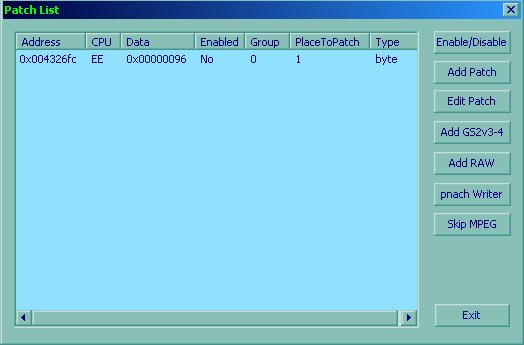
To write the patch to a file in the mentioned patches folder (i.e. save the patch to disk) press pnach Writer button, comment the result anyhow (or leave it as it is) and push Save. We have now saved our patch/cheat to disk so it will always load and work whenever you play the game.
This patch does not permit the game to change the value at 004326fc (presumably the health) so the value will always be 150 (96 hex). Let’s finally go back in game and try to take some more damage only to find out that Claire cannot take any damage now. We have made it!
The next step can be to find the ammo storage and make it unlimited. It’s easier because you can work now with a definite number (searching for bytes with 15 (number of bullets) and then search for 14 in the result after fired one bullet). However notice that this game will not store the ammo on one address but it rather can be stored anywhere within your item list box (your bag?). If you find the ammo value and set it to 100 the game will set quantity of any item you place in that slot to 100. It’s not a big problem though as the ammo issue is now solved.
This game is quite easy to cheat but there are games that never store the values in certain stable places the placing may change the next time you load the game or even during the game progress so you’d need to find the current value position, change it (increasing the first-aids number for example) and play further on.
This concludes the tutorial. Have fun and good luck cheating!
Game cheats
Patching system is one of the most splendid features of PCSX2. Some patches will help you make the broken game playable by messing with its code skipping some of its parts. You’ll have to discover and download these patches from the Internet. Still there are other patches help you cheat on games while playing. So even if your skill is not enough to beat the game fairly you won’t be frustrated like on the real PS2. All you have to do is to find or better yet create your own cheat for the game. Here goes a small tutorial that can help you understand a bit how does these cheats work and how to create your own cheat.
PCSX2 uses so-called CRC for each game. This CRC is a special control sum of all bytes in the main game executable. It helps to distinguish not only the different games but even the different regions and the different editions of one game. This is a precaution not to apply the patch created for one game version on another making the game unplayable/crashing. The CRC is a 8 chars long hexadecimal number. You can find the number for your game in PCSX2 console when the game is starting (or on the console caption in some PCSX2 versions, it looks like «Game running [CRC=xxxxxxxx]«).
This tutorial will cover the game Resident Evil Code: Veronica X. This is not a simple game to play and it’s quite simple to cheat plus you may need some cheats playing it. The game starts in a prison with only a knife for a weapon. Our first priority will be to make Claire immortal so her condition will steadily be in green. There is a byte or a word (2 bytes) somewhere in the game memory that is responsible for storing the Claire’s condition. Let’s assume this is a byte first. We will need to vary this value to catch it so Claire has to take some damage and find a green herb to be able to restore it. It’s quite easy to take any amount of damage in this game so it won’t be a problem. When you get to the safer place (it may prove harder) press ESC and choose Patch Finder. from the Misc submenu of main GUI menu. The pictured dialog will pop up. The dialog allows us to search through EE RAM and IOP RAM. Assuming the main work is done by EE processor let’s start to search for our condition byte in EE RAM. Every byte has 8 bits and it is the smallest data unit so we will select 8bits size. Let’s assume also that the condition cannot be less than zero (unsigned) although it will not make much difference if we would assume otherwise.
Currently this dialog holds no data; this is its starting state. As the Claire health must not be equal zero now (or else she would die) let’s select Not Equal, compared to Specific Value and place a zero in the edit box. Let’s hit Search after that. The program will find some 13 million values not equal to zero. That’s good for a start. Let’s hit Close button now and return to game by Run—Execute.
We’ll need to walk around a bit (make a few steps) and press ESC again getting to the patch finder by Misc—Patch finder menu. We can see that the page is still holding our previous search so now we will search in those 13,5 million bytes left (we need to find only one!). There are no changes in Claire condition from the last time so set the options as Equal and Old Value (we’re leaving only those bytes not changed from the previous search). Press Search button again. Now the number of result bytes is decreased by many thousands maybe a million if you’re lucky enough (see Intermediate stage picture).
Let’s enable now our new found cheat to see if it will work. Leave the patch finder dialog and start Patch Browser. from the same Misc menu instead. You will see the only line in the tables which must be our patch (see the picture Patch Browser dialog). Select it and press Enable/Disable button to enable the patch (notice its state has changed).

To write the patch to a file in the mentioned patches folder (i.e. save the patch to disk) press pnach Writer button, comment the result anyhow (or leave it as it is) and push Save. We have now saved our patch/cheat to disk so it will always load and work whenever you play the game.
This patch does not permit the game to change the value at 004326fc (presumably the health) so the value will always be 150 (96 hex). Let’s finally go back in game and try to take some more damage only to find out that Claire cannot take any damage now. We have made it!
The next step can be to find the ammo storage and make it unlimited. It’s easier because you can work now with a definite number (searching for bytes with 15 (number of bullets) and then search for 14 in the result after fired one bullet). However notice that this game will not store the ammo on one address but it rather can be stored anywhere within your item list box (your bag?). If you find the ammo value and set it to 100 the game will set quantity of any item you place in that slot to 100. It’s not a big problem though as the ammo issue is now solved.
This game is quite easy to cheat but there are games that never store the values in certain stable places the placing may change the next time you load the game or even during the game progress so you’d need to find the current value position, change it (increasing the first-aids number for example) and play further on.
This concludes the tutorial. Have fun and good luck cheating!
Pcsx2 читы как использовать
Многие задавались вопросом как же использовать читы от PS2 игр на PS3.
Делаем следующие:
1) Нам понадобятся нужные утилиты, игра и сами читы.
2) Открываем образ в UltraISO (с говно-сборками от NoRG там где скрыты файлы просьба не беспокоить), извлекаем файл ****_###.## (обычно это ID игры), но возможны и другие варианты.
Приведу пример на игре BlowOut (USA). Из образа извлекаю файл SLUS_208.50, запускаю pnach_converter.exe, в файле Cheats.txt нахожу нужные мне читы и вставляю их в левую колонку pnach_converter:
Infinite Health
201AE084 3C0142C8
201AE08C AE011DD4
Infinite Ammo
20193638 00000000
После редактирования это должно выглядеть вот так (заметьте, первое число нужно заменить на 0):

Ставим галочку на опцию ELF и перетягиваем свой ****_###.## на кнопку Browse и жмём Convert, получаем ****_###.##. elf.
Запускаем CDMage, жмём Открыть (Тип файлов: M1/2048 track (*.iso)) открываем свой образ. На файле ****_###.## правой кнопкой мыши выбираем Вставить файл и заменяем полученным ****_###.##. elf.
Вот и всё
Скачать: 

Полная настройка эмулятора PCSX2
Данная инструкция предназначена в первую очередь для новичков в эмуляции, но думаю многим опытным эмуляторщикам тоже стоит ее прочитать, хотя бы для изучения различных функций. Вместе с новым интерфейсом в pcsx2, появилось и множество вопросов, так как практически все было переименовано и переделано, а также добавилось множество новшеств по сравнению с версией 0.9.6. Надеюсь данная инструкция вам поможет и эмуляция PS2 с помощью эмулятора Pcsx2, станет более понятной.
Рассмотрим пример на последней ревизииpcsx2 R3616 вышедшей на данный момент.
Перед запуском настроек необходимо убедится в наличие установленных компонентов и различных библиотек и утилит таких как :
• DirectX End-User Runtimes (июнь 2010)
• Visual C++ 2008 SP1 Redistributable Package (x86)
также не забудьте обновить драйверы видео карт:
• Примерные системные требования
o Минимальные:
Процессор Intel Core Duo/AMD Athlon X2 2.0GHz
Оперативная память 1Gb
Видеокарта с поддержкой DirectX 9
Windows XP
o Рекомендуемые:
Процессор Intel Core Duo/AMD Phenom X2 3.2GHz и выше
Оперативная память 2Gb
Видеокарта с поддержкой DirectX 10/11
Windows Vista SP2/Windows 7
Важно! У эмулятора существует проблема с кирилицей. Путь к эмулятору ни в коем случае НЕ должен содержать русских символов, иначе при запуске игры будет возникать ошибка вроде «File cold not be created or opened» также следует избегать чрезмерно длинных путей установки:
Первое окошко предупреждает нас, что это нестабильная версия эмулятора (то-есть не финальная), не обращаем внимания и просто жмём «OK»:
В этом окошке все, что нужно настроили, жмём кнопку «Next» для продолжения:
Это окно предлагает нам создать путь каталога «inis» жмём кнопку «Create»:
Нажимаем «Next» и переходим к следующему окну настроек:
На этом все, жмем «Finish» для окончания настройки и запуска эмулятора. Если в чем-то неуверенны, то всегда можете нажать «Back», чтобы вернуться к предыдущему окну настроек.
Оставшиеся показатели разбирать не будем, так как они не важны. Если ваша игра тормозит, значит нужно проводить более детальную настройку эмулятора. Закрываем окно эмуляции и перезапускаем эмулятор.
1.SSE4.1
2.SSSE3
3.SSE2
Итак, возникает вопрос, какой использовать и чем они отличаются:
SSE4.1 плагин содержит в себе процессорные инструкции нового образца, поэтому его можно использовать только на процессорах Intel семейства iCore, на других системах эмулятор будет просто виснуть перед началом эмуляции. Скорость эмуляции не очень сильно отличается от SSSE3 плагина (
5%), но картинка немного чище и меньше глюков с графикой.
SSSE3 плагин как видно из названия содержит дополнительные инструкции SSSE3, которые есть только в процессорах Intel Core2Duo, на других обеспечен вылет эмулятора. Разницы в скорости эмуляции между SSE2 и SSSE3 не заметил, но графических багов меньше.
SSE2 плагин можно использовать практически на любых процессорах, которые поддерживают эти инструкции (начиная с AMD Athlon 2400+ вроде). Если у вас не iCore или Core2Duo, использовать получится только его. Он несколько медленнее остальных двух, но если у вас нормальная видеокарта (начиная от Nvidia 8600GT), то разница не ощутима.
Из всего вышеописанного мы приходим к выводу, что не так уж важно какая из модификаций поддерживается вашим процессором, более важно иметь хорошую видеокарту, так как некоторые игры довольно требовательны, если вы хотите играть на хорошем разрешении, да еще и с антиальясингом. После того как определились, какой GSdx выбрать, нужно разобраться с его настройками, что я и хочу сейчас вам рассказать.
Важно! Для полной работоспособности видеоплагина и доступности всех режимов, у вас обязательно должна быть установлена последняя версия DirectX. Последнюю сборку DirectX можно скачать с оффициального сайта Microsoft.
Hardware режим использует вашу видеокарту для рендера спецэффектов.
Software не использует видеокарту, вся эмуляция спецэффектов и объектов ложится на процессор. Полезен на 4-х ядерниках и выше, особенно если в эмулируемой игре проблемы со спецэффектами
Null полностью отключает рендер видео, благодаря чему эмуляция идет со стопроцентной скоростью, но играть естественно невозможно. В основном Null предназначен для отладки, выбирать его не стоит.
4)—Or use Scaling Как вы уже догадались это антиальясинг, то есть сглаживание всех неровностей в изображении, на 2D спрайты он не действует. Чем выше выставите, тем больше сглаживание и благодаря этому можно добиться качественного изображения при малом разрешении. По возможности старайтесь его не использовать (1х по стандарту, то есть не используется), так как ресурсы видеокарты не безграничны.
6)—Experimental HW Anti Aliasing- это функция сглаживания, заметно повышает качество изображения, но может заметно снизится частота кадров, используйте только если уверенны в достаточной мощности своего ПК.
7)—SW rend. threads активен только при использовании Software режима Direct3D. Позволяет вам выбрать количество ядер процессора, которые будут задействоваться для эмуляции картинки. Если у вас 4-х ядерник, советую выставить 3 ядра (одно под винду), чтобы система полностью не нагрузилась.
В правой части окна находятся кнопки действий консоли. Чтобы назначить на них свою клавишу, просто нажмите левой кнопкой мыши на нужной и жмите нужную вам клавишу на клавиатуре или джойстике. Если все сделали правильно, то в левом окошке появится строка с вашей настройкой.
Если хотите поиграть с другом и нужно настроить управление еще одного игрока, переходим на вкладку PAD2. В плане настроек все также, как и для первого игрока (вкладка PAD1). На этом все, жмем «Применить», «OK» и идем дальше.
5)- Галочки Flush to Zero и Denormals are Zero обязательно включаем.
Вот в принципе и все. Во вкладке «Plugins» вы можете выбрать различные плагины, которые мы настраивали при первоначальном запуске эмулятора. Жмем «Apply», «OK» и перезапускаем эмулятор. После всех наших манипуляций скорости эмуляции вашей игры должна намного возрасти. Если возникают проблемы, то снова идем в настройки и перебираем различные хаки, пока не добьемся хорошего результата.
Если в сборнике нет кодов / паролей к игре, и вы желаете их добавить., перейдите в раздел, нажав кнопку: Добавить. Мы будем вам признательны за наполнение сборника кодов. Желаем вам хорошего настроения и ностальгии. OldCityRetroGames.ru
If you know cheat codes, secrets, hints, glitches or other level guides, that can help others leveling up, then please: Submit your Cheats. and share your insights and experience with other gamers. thx from OldCityRetroGames.ru


| —>
Все права на материал с сайта сохранены и принадлежат их авторам. Любое копирование текста с сайта должно сопровождаться прямой активной ссылкой на наш сайт. Все игры (в том числе и онлайн), эмуляторы, и другие программы и материалы, предоставляются на некоммерческой основе (бесплатно) игры скачанные с этого сайта, носят ознакомительный характер и после ознакомления должны быть удалены. Некоторые материалы доступны на картриджах и других легальных носителях, поэтому могут быть приобретены для частного использования. Pcsx2 читы как использовать
Попросили вернуть не что иное, как мою статью по использованию читов в эмуляторе ePSXe. Нетривиальная оказалась задачка, так как все статьи были удалены уже давно. More to come… Сейчас мы разберемся, как вводить коды на эмуляторе PlayStation — epsxe. Небольшая прелюдия. Наверно многие из вас слышали о такой полезной вещи для приставок, как «взломщик кодов». В отличие от известных в России Game Guru, где на диске было собрано большое количество взломанных сохранений (впрочем, тоже неплохая вещь была), возможности взломщиков практически безграничны. Поставить неуязвимость, бесконечные деньги и патроны — это практически базовые их возможности. На самом деле все доходит до совершенно чумовых вещей: получить нужный предмет здесь и сейчас, дать персонажу прием другого персонажа, которого у него быть не может, и даже вообще добавитьв партию героев, которых там быть не должно, и черт знает сколько всего еще. Один пример: проходим всю Final Fantasy VII с Аэрис. Она даже будет сражаться с Сефиротом в конце. Или же также включим Сефирота в команду. Таких взломщиков довольно много, и они существуют для многих приставок. За рубежом всегда популярны были Game Shark, Action Replay, Xploder. В России было много китайских вещичек, самых разнообразных. Автор этой статьи давным-давно 1 января получил в подарок Взломщик Кодов 9000, чему остался несказанно рад на протяжении всего временного периода обладания приставкой PlayStation. Поскольку, мы с вами сегодня собрались, чтобы взламывать именно игры для первой PlayStation, то на примере этой вещи и рассмотрим принцип действия. Во Взлощике Кодов обычно поставляется специальная плата (в данном случае, «обычная» карта памяти для Соньки). Обычно также всегда в комплекте идет диск с базой кодов. Вставив карточку в консоль, активировав нужные коды (например, выбираем неуязвимость и бесконечные патроны для Metal Gear Solid разом), нам остается только вставить диск с игрой и насладиться результатом. Если нужного кода в базе не оказалось, его нужно добавить самому. В наше интернетное время это сделать несложно, а 10 лет назад автор находил коды в книжках.
Старый добрый Game Guru
Кавайный Game Shark для PlayStation 2
«Отчечественный» Взломщик кодов 9000
Вот такая вот Final Fantasy VII. Не Фотошоп Многие когда-то приобретают компьютер, но лишаются игровых приставок. Эмуляторы позволяют восполнить последний пробел, если не учитывать зверкские споры «где лучше играть, на эмуляторе или на приставке». Несмотря на читы другого рода (быстрое сохранение, например) на эмуляторах, порой очень недостает «тех самых» читов в виде кодов. И если с помощью ArtMoney еще реально накрутить себе денег в Final Fanatsy VII, то вот Аэрис и Сефирота вы таким образом в команду никогда не поставите. К сожалению, в вашего мощного железного друга (компьютер, если что) никакой карты от Взломщика 90000000 не засунуть. А ведь столько кодов пропадает. Всем хорош эмулятор первой PlayStation epsxe. Если помудрить с настройками, то вполне получить ощущения игры как на оригинальной приставке. А вот когда для него выпустили плагин, позволяющий использовать эти самые тысячи кодов для Взломщика — вот это стало настоящим праздником для читеров и простого народа, желающего облегчить себе игру, но уже на эмуляторе. Теперь распишем во всех подробностях, что, как и куда ставить.
|