Qr код кистей в ibispaintx
Пользовательские кисти, созданные на ibis Paint могут быть экспортированы и импортированы в качестве QR-Code-изображений. Вы можете выпустить QR-Code-изображения пользовательских кистей, созданных в социальных сетях, или отправить их по электронной почте, легко делясь своими кистями с друзьями.
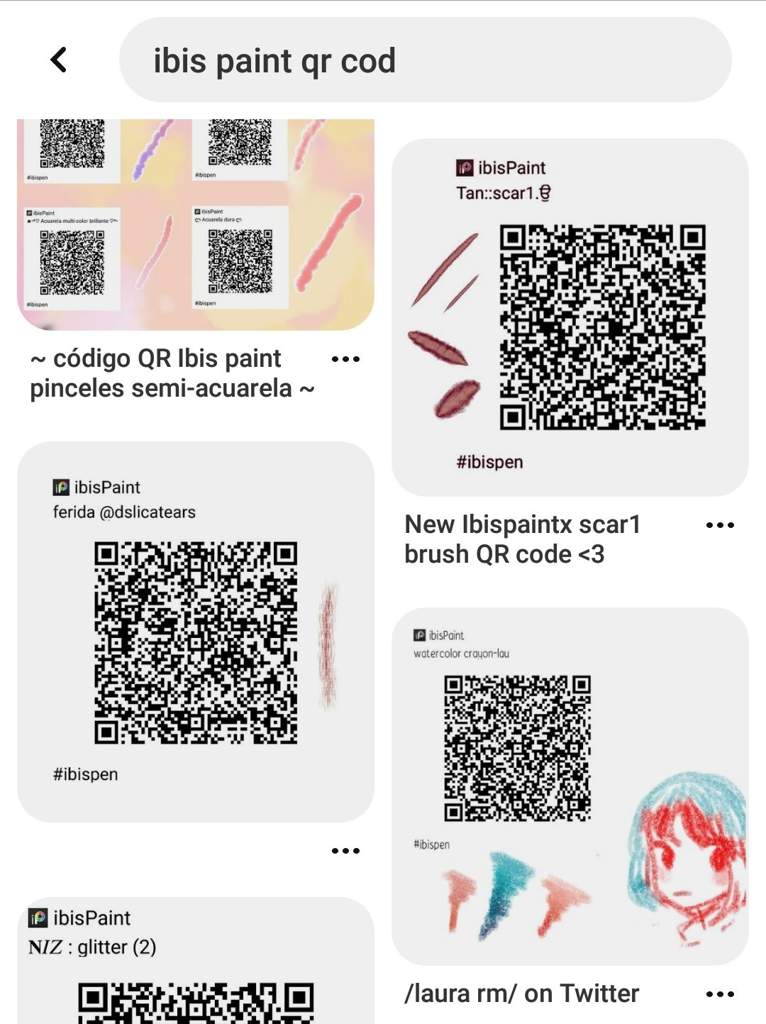
На платформах социальных сетей, таких как Facebook и Twitter, ibisPaint пользователи выпускают различные QR-Code-изображения пользовательских кистей с хэштегом #ibispaint. Это также интересно искать и опробовать пользовательские кисти, которые выпущены на платформах социальных медиа.

Открыть ①Окно кисти. Выберите ②Ручка (таможня), и от ③Меню, выберите ④Экспорт QR-Code кисти.
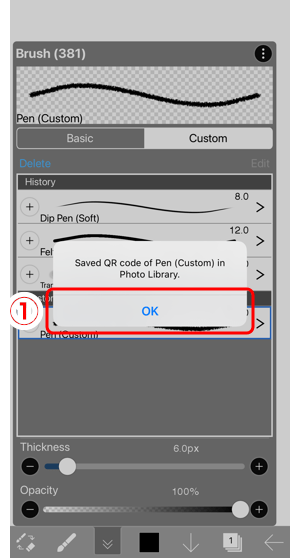
Экспорт кисти завершен. Нажмите на ①Хорошо и закройте окно.

Изображение с QR-Code хранится в фототеке.

Чтобы импортировать изображение QR-Code кисти, откройте ①Кисть окно, и из ②Меню, выберите ③Импортная QR-Code кисти.

Выбрать ①QR-Code-изображение для кисти.

Импорт кисти завершен. Коснитесь ①Хорошо и закройте окно.
Туториал по QR кодам в ibis Paint X


:telescope: //OH MY GODく::
여기 Сегодня у нас туториал
По QR кодам в ибисе °
Сначало мы заходим в любой браузер
Если у вас нет Pinterest
И пишем QR cod ibis Paint X

Дальше у вас должны быть такие кодики с примером кисти как у меня \\
Далее мы сохраняем вот такую картинку илиже код

И переходим в ibis Paint X

И нажимаем на кисти

Далее мы нажимаем на 3 точки в правом верхнем углу

Послее этого у вас появится галерея, и вы выберете тот код который вам нужен

Далее после нажатия на картинку вы переходите обратно в ibis Paint X, и нажать ок чтобы импортировать код

Всё теперь вы имеете кисть которая вам нужна


Поделиться с
Лайки (15)
Комментарии (5)
а что если у меня нет этих трёх точек?
Вау, не думала что ещё можно добавить кисти с помощью кодов.
самое интересное что у меня уже был пост с QR-кодами кистей эгххх
— Прошу прощение, что раньше не увидила
Во блин, я наверное не читала, теперь чувствую себя тормозом.
Окей, мы просто нюхаем снюс
Окей, мы просто нюхаем снюс
:black_circle:
Амино по играм gacha club и gacha life
Вступить Создать запись

Репутация
Подписки
Подписчики
Другие записи я не умерла ок, да?
:sunny: ⇌《•❞ 𝐀𝐜𝐪𝐮𝐚𝐢𝐧𝐭𝐚𝐧𝐜𝐞 ༽:: ꜛ
Политика в отношении файлов «Cookie»
Данный веб-сайт сохраняет файлы cookie в вашем браузере в целях совершенствования навигации в сети и отображения персонализированного контента. Прочитайте нашу Политику конфиденциальности и Политику в отношении файлов cookie, чтобы получить подробную информацию и узнать, как настроить параметры.
Qr код кистей в ibispaintx
Ibis Paint имеет много реалистичных и различных кистей. Каждая кисть имеет различные настройки, и вы можете создать свою собственную кисть, регулируя каждый параметр. Если вы сохраните созданную кисть? Пользовательские кисти?, Вы можете использовать его в любое время. В этом разделе описывается каждый параметр кисти.
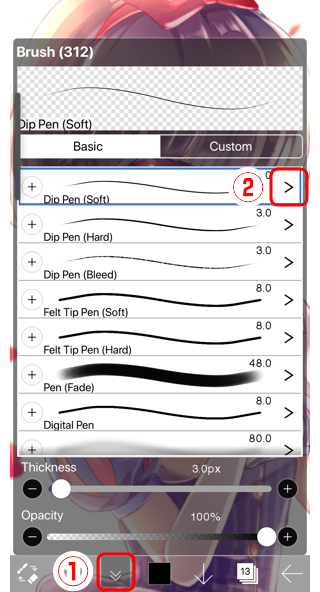
Давайте отобразим настройки кисти. Открыть ①кисть окна и крана ②>.
①Базовая версия. Делает основные настройки, такие как толщина кисти и непрозрачность.
②Fade. Создает настройки кисти, такие как форма старта и конца, непрозрачность и степень размытия.
③Форма. Создает настройки, связанные с формой кисти, такие как форма шаблона кисти, непрозрачность и интервал.
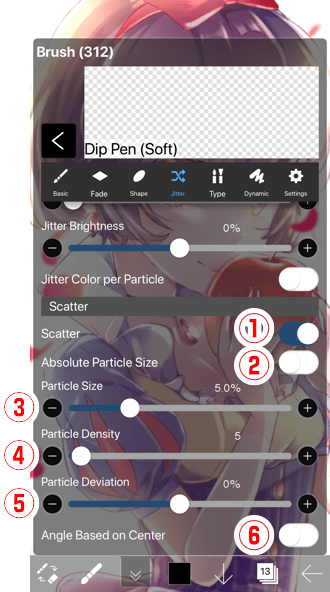
④Джиттер. Делает такие настройки, как толщина, непрозрачность, цветовая нервозность, плотность частиц, отклонение и т.д.
⑤Тип. Создает настройки типа и текстуры кисти. Эта вкладка отображается при использовании кисти.
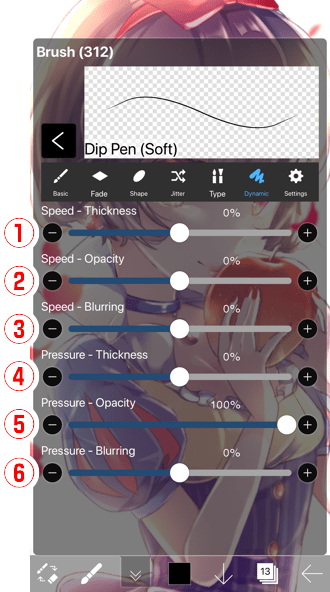
⑥Динамика. Настройки толщины кисти, непрозрачность и размытие изменяются из-за скорости и давления хода пальца или пера.
⑦Настройки. Создает такие настройки, как мин кисти и максимальная толщина, режим смешивания, название кисти и настройки кисти.
⑧Текстура. Эта вкладка отображается при использовании ластика, размазать или размытия инструмента. Вы можете настроить текстуру.
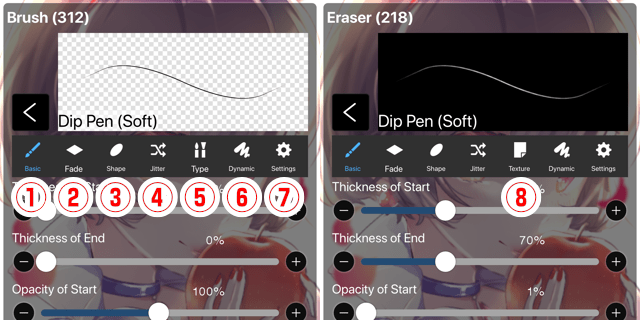
①Тонкий. Создает настройку толщины кисти.
②Непрозрачность. Создает настройку непрозрачности кисти.
③Тонкость старта. Делает настройки толщины начала штриха за счет соотношения значения «Толщина».
④Тонкость конца. Делает настройки толщины конца штриха за счет соотношения значения «Толщина».
⑤Непрозрачность старта. Делает настройки непрозрачности начала штриха из-за соотношения значения «Непрозрачность».
⑥Непрозрачность конца. Делает настройки непрозрачности конца штриха из-за соотношения значения «Непрозрачность».
⑦Сила Fade Out. Включите, чтобы применить более сильный эффект к концу хода, чем «Толстость» и «Непрозрачность» настройки.
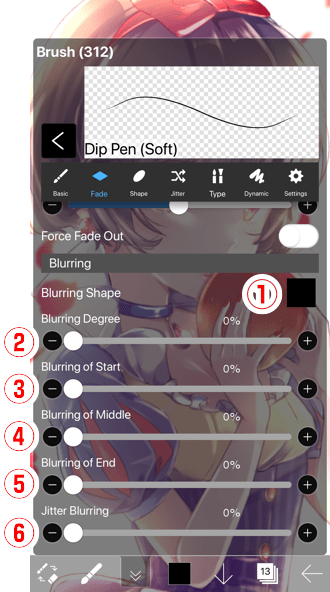
①Размытая форма. Создает настройки размытой формы. Выбор «Off» отключает другие параметры размытия.
②Размытая степень. Создает настройки общей степени размытия.
③Размывание старта. Создает настройки степени размытия в начале хода.
④Размывание среднего. Создает настройки степени размытия в середине штриха.
⑤Размывание конца. Создает настройки степени размытия в конце хода.
⑥Дизтер размытия. Делает настройки того, как случайным образом размытие изменения в диапазоне до значения «Blurring Degree» как максимальное значение. Увеличение значения делает размытие случайным, хотя в то же время оно будет менее размытым.
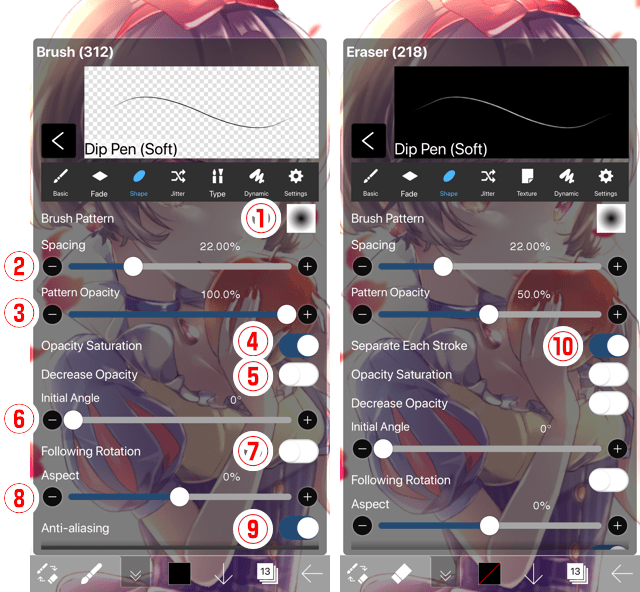
①Шаблон кисти. Создает настройки формы кисти.
②Расстояние. Делает настройки интервала шаблона кисти из-за соотношения значения кисти «Толстость».
③Непрозрачность шаблона. Делает настройки непрозрачности шаблона кисти из-за соотношения значения кисти «Непрозрачность».
④Непрозрачность. Эта функция может быть установлена при использовании инструмента кисти или ластика. При включении, до сенсорного вверх непрозрачность не будет выше, чем значение «Непрозрачность», даже если перекрасится. Если выключится, непрозрачность будет затемнена каждый раз, когда вы рисуете еще до сенсорного.
⑤Снижение непрозрачности. При включении он нарисован ниже значения «Непрозрачность». Там нет эффекта, когда значение «Непрозрачность» составляет 100%.
⑥Первоначальный угол. Делает настройки угла шаблона кисти.
⑦После вращения. При включении угол рисунка кисти следует направлению штриха.
⑧Аспекты. Уменьшение значения делает рисунок кисти вертикально длиннее, а увеличение делает рисунок кисти шире. Когда значение 0% длина и ширина будут одинаковыми.
⑨Антиалии. При включении края шаблона кисти нарисованы менее зубчатыми. При выключении края шаблона кисти неровные.
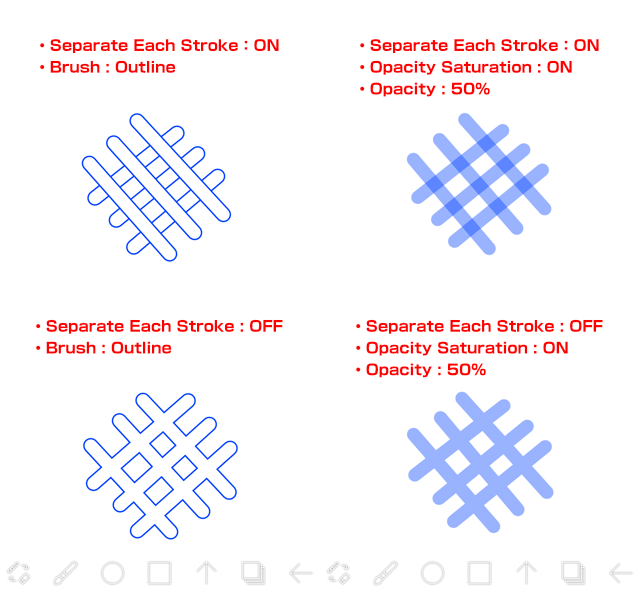
⑩Отделить каждый удар. Эта функция может быть установлена при использовании инструмента кисти или ластика. При выключении процесс рисования не будет разделен каждым штрихом. Например, если «Отдельный ход» выключен и вы рисуете кистью «Outline», граница штрихов соединена, даже если они разделены касанием. Кроме того, когда «Непрозрачность» включена и значение «Непрозрачность» составляет 50%, непрозрачность не меняется и будет той же темноте, даже если перекраивается.
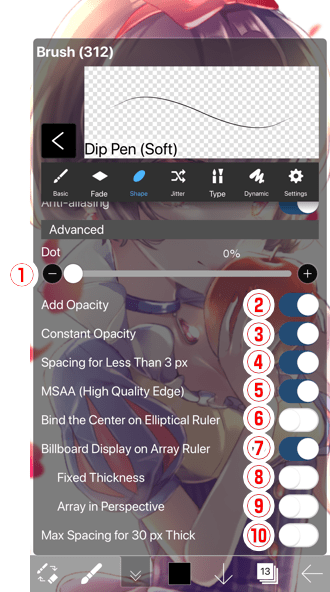
①Точки. Когда значение устанавливается до 1% или более, шаблон кисти обращается на дискретных положениях в зависимости от толщины кисти.
②Добавить непрозрачность. При включении непрозрачность шаблона кисти нарисована с помощью «Добавить». Поэтому, когда выключили это будет более непрозрачным.
③Постоянная непрозрачность. При включении непрозрачность шаблона кисти нарисована с определенной плотностью. При выключении он рисует с непрозрачностью в зависимости от текущих значений «Непрозрачность» и «Расстояние». При выключении рисунок будет более прозрачным, чем при включении.
④Расстояние для менее чем 3 px. При выключении кисти с «Толщина» менее 3px нарисованы, как толщина значения это без изменения. При включении толщина становится 3px и интервал ы чертежа становится шире.
⑤MSAA (Высокое качество края). MSAA сокращается от «Многообразия анти-алиазирования». При включении рисунок кисти нарисован менее зубчатым, что улучшает общее качество изображения.
⑥Связать Центр на эллиптический правитель. Эта функция включена при включении «После вращения». При включении и использовании кисти, как «Flash» с «Elliptical Ruler», вы можете нарисовать шипы к центру эллипса.
⑦Дисплей Billboard на линейке array. Используйте эту настройку, когда кисть вызывает неестественный рисунок во время использования «Array Ruler», например, «Grass». При включении «Fixed Thickness» и «Array in Perspective» становятся настраиваемыми.
⑧Фиксированная толщина. Эта функция может быть установлена, когда «Billboard Дисплей на Array Ruler» на. Например, при рисовании здания с перспективой с помощью «Array Ruler» включите его, если вы хотите, чтобы толщина линии была однородной между передней и задней.
⑨Массив в перспективе. Эта функция может быть установлена, когда «Billboard Дисплей на Array Ruler» на. Например, кисти, которые не подключаются должным образом при использовании «Array Ruler», такие как «Lace» или «Chain», могут быть нарисованы.
⑩Макс Интервал для 30 px Толстый. При включении, вы можете уменьшить проблему кисти шаблон виден, когда толщина 30px или более для кисти для рисования линий, как «Dip Pen».
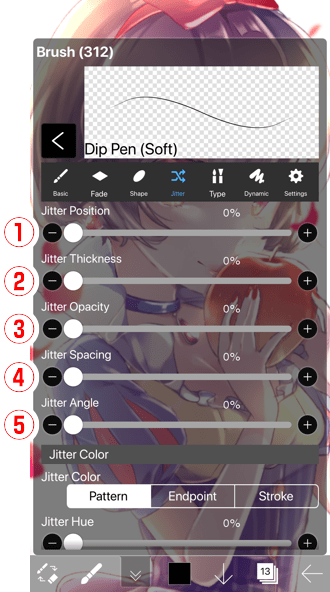
①Позиция дьежи. Делает настройки, как случайно толщина кисти шаблон будет распространяться из-за значения «Толстость».
②Толщина двиттера. Делает настройки, как случайно толщина кисти шаблон будет толстым из-за значения «Толстость». Он становится тоньше, когда вы устанавливаете значение больше.
③Джитная непрозрачность. Делает настройки, как случайно непрозрачность шаблона кисти будет из-за значения «Непрозрачность». Он становится прозрачным при установке значения больше.
④Дизтер Интервалы. Делает настройки, как случайный интервал шаблона кисти.
⑤Угол дизера. Делает настройки, как случайный угол шаблона кисти.

①Моно. Если рисунок кисти черно-белый, белизна будет преобразована как непрозрачность, а если она цветная, то она будет монохромной.
②Водные воды. Вы можете использовать смешанную акварель, которая может смешивать окрашенный цвет с цветом ниже.
③Двойной. Вы можете использовать двойную цветную кисть, которая может рисовать очертания и затененные тексты.
④Цветовая гамма. Эта функция может быть установлена, когда «Brush Pattern» является цветом. Вы можете использовать цветную кисть.
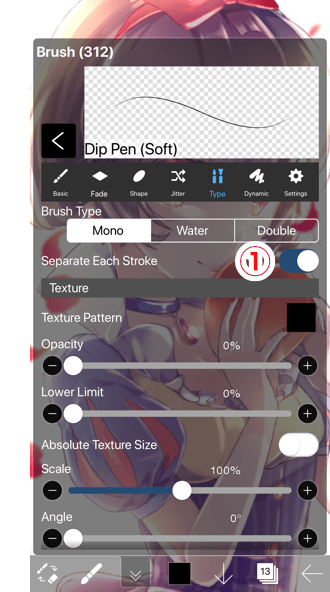
①Отделить каждый удар. Эта функция может быть установлена, когда тип кисти «Mono». При выключении рисунок не будет разделен штрихами.
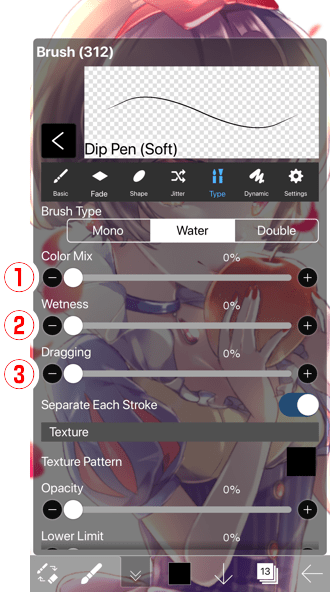
①Цветная смесь. Эта функция может быть установлена, когда тип кисти «Вода». Вы можете установить, сколько смешать окрашенный цвет с цветом ниже.
②Влажность. Эта функция может быть установлена, когда тип кисти «Вода». Вы можете установить, сколько непрозрачность окрашенного цвета и цвет ниже смешиваются. Чем выше значение «Wetness», тем больше непрозрачности будет смешано с цветом ниже и цвет будет светлее.
③Перетаскивание. Эта функция может быть установлена, когда тип кисти «Вода». Можно установить процент для расширения окрашенного цвета без изменения непрозрачности.
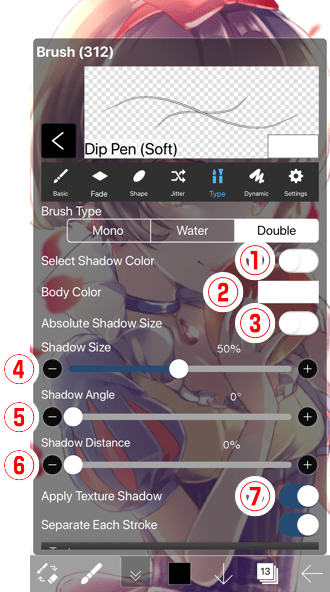
①Выберите Цвет тени. Эта функция может быть установлена, когда тип кисти «Двойной». При включении, цвет, который может быть установлен с «Цвет кнопки» в правом нижнем нижнем нижнем цвете «Brush Preview» является цвет контура или тени. Когда он выключен, вы можете установить основной цвет кисти.
②Цвет тела. Эта функция может быть установлена, когда тип кисти «Двойной». Когда «Выбрать цвет тени» выключен, вы можете установить основной цвет кисти. Когда он на, вы можете установить контур или цвет тени.
③Абсолютный размер тени. Эта функция может быть установлена, когда тип кисти «Двойной». При включении можно установить контур и размер тени с помощью px. При выключении можно установить размер на процент текущего значения кисти «Толстость».
④Размер тени. Эта функция может быть установлена, когда тип кисти «Двойной». Можно установить размер контура и тени.
⑤Теневой угол. Эта функция может быть установлена, когда тип кисти «Двойной». Вы можете установить контур и углы тени.
⑥Расстояние теней. Эта функция может быть установлена, когда тип кисти «Двойной». Вы можете установить, как далеко контур и тень от центра кисти.
⑦Применить Текстура Тень. Эта функция может быть установлена, когда тип кисти «Двойной». При включении «Texture» также применяется к контурам и теням. При выключении он применяется только к кисти.
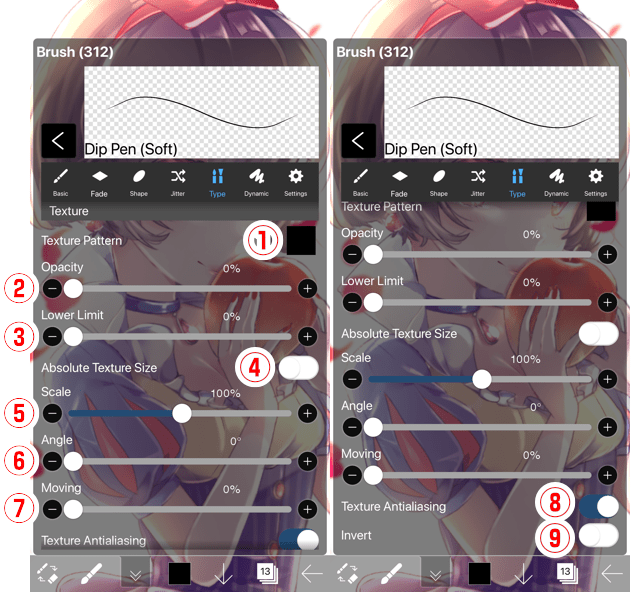
①Текстурный узор. Создает настройки текстурного узора. При выборе «Off» другие параметры будут отключены. Однако, если «Инверт» на, другие параметры будут действительны, даже если «Off» выбран.
②Непрозрачность. Делает настройки, как темно текстуры шаблон применяется.
③Нижний предел. Уменьшает количество текстурного рисунка. Когда значение 0%, текстура шаблон не может быть перекрашен, но, как значение увеличивается, становится возможным перекрасить.
④Абсолютный размер текстуры. При включении «Шкала» наносится на исходный размер текстурного шаблона. При выключенном отключении «Шкала» наносится на текущий размер холста.
⑤Масштаб. Создает настройку размера текстурного узора.
⑥Угол. Делает настройку угла текстуры шаблона.
⑦Перемещение. Создает настройку, следует ли штрих шаблону текстуры или фиксируется. Когда значение увеличивается, рисунок текстурного рисунка следует за движением штриха, и рисунок становится похожим на размытый узор.
⑧Текстура Антиалиазы. При включении антиалиазирование наносится на текстурный узор и разглаживает рисунок. При использовании шаблона, как пиксель искусства, лучше выключить его, чтобы рисовать лучше.
⑨Инвертировать. Перевернуть белые и черные части текстуры и применить.
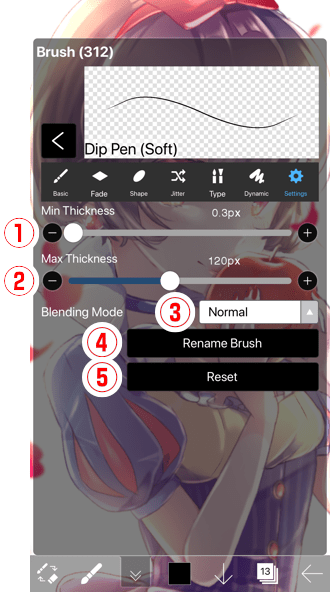
①Мин Толщина. Делает настройку минимального значения ползунка «Толстость».
②Максимальная толщина. Делает настройку максимального значения ползунка «Толстость».
③Режим смешивания. Создает настройку режима смеси кисти.
④Переименуйте кисть. Вы можете изменить имя кисти.
⑤Перезагрузка. Можно сбросить настройки кисти. Кнопка сброса «Базовая кисть» может сбросить настройки кисти на их значения по умолчанию. Кнопка сброса «Custom Brush» позволяет вернуться к настройкам, которые были у вас при добавлении кисти в пользовательскую кисть.
QR коды для кистей в ibis paint x
Qr коды кистей в Ibis paint X

\\\Пак кистей для ibisPaint x///Подробнее
Коды для кистей в Ibis Paint
#Shorts #Music #Рекомендации #РекиПодробнее
||Кисти в IbisPaintX|| палю лицо😱||Подробнее
QR-коды кистей в ибис пэйнт х [ibis paint x]Подробнее
Как добавить кисть в ибис паинт? ||Гача лайф || ЮкиПодробнее
💖 Коды для кистей + коды для ВС 💖
/QR коды в Ибис паинт/Подробнее
[]коды кистей для ibis paint x[]
кисти в ibis paint x
QR codes | QR коды на кисти в Ibis Paint X | #1Подробнее
「КРУТЫЕ КОДЫ КИСТЕЙ В IBIS PAINT X 」「 3 ЧАСТЬ 」「 HITOMISU 」Подробнее
🌌/КОДЫ ДЛЯ КИСТЕЙ В ИБИС ПАИНТ\🌌Подробнее
Как пользоваться кодами для IbispaintX || как добавить QR код в IbispaintXПодробнее
🖌QR коды кистей которыми я пользуюсь для ibis paint x🖌Подробнее
топ 5 QR кистей для Ibis paint X 😎Подробнее
QR коды для IbisPaint X | коды для IbispaintX | кисти для IbispaintX | пак кистей в IbispaintXПодробнее
Qr код кистей в ibispaintx
With Find Edges (Handwriting), it is possible to detect outlines from photographs and illustrations to create hand-drawing style line drawing illustrations. In the work example, a black and white illustration like a pencil drawing is created by detecting outlines from photographs.

Tap ①[Tool Select window] and select ②[Filter].
Tap ③[Adjust Color] and select ④[Find Edges (Handwriting)].
Set your preferred Tickness, Amount of Lines, and Sensitivity. Tap ⑤[✓] when the setting is complete.
Add paper image materials to the background and also add a grayscale photograph and noise to complete. Photo provided by: (https://publicdomainq.net/woman-girl-portrait-0056287/)
4 New Brushes
We’ve added 4 new realistic brushes including “Coarse Pencil”, “Coarse Pencil (Light)”, “Bleed Watercolor”, and “Bleed Watercolor (Dark)” to give your illustrations an even broader range of expression.
Coarse Pencil, Coarse Pencil (Light), Bleed Watercolor, and Bleed Watercolor (Dark)
Ver.9.0.0 New Features
Perspective Form: Type of Repeat configuration is now selectable
When using the Transform tool, “Perspective Form”, you can now choose 4 repeat types, namely “None”, “Inner”, “Horizon”, or “Full”. This makes it even easier to paste stock images onto illustration backgrounds. In this example, we show how we use a checkered pattern stock image to create a horizon.
Tap on ①[Material tool] and select [Tile (Checker : Black) 02] from ②[Bricks & Tiles (Color)].
Tap on ③[Perspective Form] and select ④[Horizon] under Repeat. Configure the repeat amount and phase displacement as you like.
Paste the material so that the tiles stretch from the front of the canvas to the back.
Add a stock image of the sky in the background and voila!
| None | No repetition |
|---|---|
| Inner | Repeats in the inner part of the layer |
| Horizon | Repeats in both the inner and outer layer |
| Full | In addition to repeating at the horizon, it also inverses the layer and mirrors the repeated pattern |
Layers:Support for Moving and Transforming Folder
It has now possible to use “Move Layer” for folders. You can move and transform multiple layers within a folder all at once. For example, by separating parts of the face of a character by folders, you can move and transform the line and fill layers within a folder at once. This enables you to make subtle adjustments to the position and size of each part easily.
①Open the [Layer window], select ②[Folder] of the part for which you want to adjust the position and size, and select ③[Move Layer].
Adjust the position and size of the parts as you like, and tap ④[✓].
It is possible to make adjustment of the nose and mouth using the same procedure.
When moving or transforming a folder which contains a frame layer or a text layer, a rasterize confirmation dialog shall be displayed at the end. In case you intend to keep such layers not being rasterized, tap [Transform without Text, Frame, and Shape Layers].
Transform: 6 types of image interpolation methods
You can now choose from 6 image interpolation methods in the “Transform” function, namely Nearest Neighbor (Dot), Average Pixel (Dot), Bilinear (Normal), Bicubic (Sharp), Lanczos2 (Sharp), and Lanczos3 (Sharp). By selecting the appropriate interpolation method, you can make your images look more appealing after interpolation than ever before.
①Open the “Tool Select window” and select ②“Transform”.
③Tap on “Interpolation Method” to select the image interpolation method.
Left (Ver.8.1.5): Interpolation turned on and image shrunk by 20%. Right (Ver.9.0.0): Lanzcos2 (Sharp) and image shrunk by 20%
| Nearest Neighbor (Dot) | No interpolation. Useful for pixel art. |
|---|---|
| Average Pixel (Dot) | Becomes pixelated when enlarged and interpolates with the average color when shrunk. Useful for shrinking images. |
| Bilinear (Normal) | Normal image quality. |
| Bicubic (Sharp) | For a sharper image quality than Bilinear (Normal). |
| Lanzcos2 (Sharp) | For a sharper image quality than Bicubic (Sharp). |
| Lanzcos3 (Sharp) | For a sharper image quality than Lanzchos2 (Sharp). |
Custom Brush Installation
You can now easily install custom brushes made by other users from the online gallery. Plenty of convenient custom brushes are uploaded to the online gallery, try installing various brushes.
Open ①[Brush Window] and tap ②[Online]
The online gallery is opened. Tap on ③[Brushes to install].
After tapping on ④[Install Brush], the brush will start installing. After the brush installation is finished, tap on ⑤[OK]. Tap on ⑥[Done] to close the online gallery.
The installed brush has been added to your custom brush list.
Canvas size selection window
You can now select a wider variety of sizes in the canvas size selection window.
On the new screen, you can select from 4 to 5 grades of canvas size from each of the drop-down buttons to the right for ‘SD (high speed)’, ‘1:1 (SD)’, ‘3:4 (SD)’, and ‘9:16 (SD)’.
Let’s look at a 1:1 ratio as an example. Tap the ①[drop-down button], next to ‘1:1(SD)’.
You can select from 5 grades of size.The larger the canvas size, the higher the image quality, and the smaller it is, the faster the app will operate.
Filter (Artistic):Bloom
You can use the bloom effect to make your illustrations look like they are glowing. For example, you can apply filters to letters to easily make a neon sign.
Prepare letters that have the “Filter: Glow (Inner)” applied to them. Open the ①[Tool Selection window] and tap ②[Filter].
Tap ③[Artistic] and select ④[Bloom].
Adjust the area, radius, brightness, and balanced to your preference and tap ⑤[✓].
Lastly, change the Blending mode to Hard Light and add shadows and Image material to the background to finish it up.
Filter (Art): Cross filter
With the ‘Cross Filter’, you can bring out the light from the shining parts of a photo or illustration. For example, when used in photographs of things like night views and illumination, it has the effect of strengthening the impact of the light’s sparkles.
Open the ①[Tool Select window] and select ②[Filter].
Select ③[Artistic] and tap ④[Cross Filter]. If you like, set the count of streaks of light, the direction of the light, the area seen as the light source, the brightness, the strength, the balance and tap ⑤[✓].
Filter (Style): God Rays
“God Rays” are an effect that allows you to make people or text in photos or illustrations look like they are emitting light. You can make a variety of different ways to express this depending on your own ideas, so it’s fun to test out a lot of your ideas. For example, you can easily show effects like sunlight peeking through the gap in the clouds.
Add new layers and paint areas where you wish to add sunlight with the brush.
Open the ①[Tool Select window] and select ②[Filter].
Select ③[Style] and tap ④[God Rays]. Set your preferred lighting direction, color, brightness, and strength, then tap ⑤[✓] button.
Hexadecimal Color Code Input
You can now create colors by inputting hexadecimal color code. You can easily use colors taken from color samples or made in another application in ibisPaint.
Open ①[Color window] and tap ②[Color Code].
Enter the color code and tap ③[OK].
The color defined by the color code input is created.
Keyboard shortcuts
Keyboard shortcuts can now be used on iPhones (iOS 14.0 or later), iPads (iPadOS 14.0 or later), and Android devices connected to a Bluetooth or USB keyboard.
⑥Switch focus to the next input box, ⑦Dialog box for OK, complete etc.
⑧Close window, Cancel dialog, Remove focus from the input box, Return to the previous screen etc.
Ver.8.1.0 New Features
New brush: Color Changing Pen
Ver.8.0.0 New Features
Special Pen: Liquify Pen
“Liquify Pen” can be used to change the shape of any place in a photo or illustration. A person’s face or body can be edited, and this is convenient for adjusting a rough sketch.
Open ①[Tool Select Window] and tap ②[Special Pen].
Open ③[Special Pen Window] and select ④[Liquify Pen].
By switching between ⑤[Drag][Shrink][Expand][Smoothen] as needed, eye size and cheek lines can be edited.
Special Pen: Lasso Fill
“Lasso Fill” can be used easily to fill a color in an area circled by a lasso. For example, if you want to add shadows to a character such as in an animated drawing, you can easily add these shadows by using “Lasso Fill” and “Layer Clipping.”
Select the artwork and add a new layer for the shadow. Open ①[Tool Select Window] and tap ②[Special Pen].
Open ③[Special Pen Window] and select ④[Lasso Fill].
Adjust ⑤[Opacity] as you like and surround the area you want to add a shadow to and fill.
Finally, clip the shadow layer with the illustration layer and hide the area that you don’t need.
Special Pen: Lasso Eraser
The “Lasso Eraser” can be used easily to erase the area selected by the lasso.
Open ①[Tool Select Window] and tap ②[Special Pen].
Open ③[Special Pen Window] and select ④[Lasso Eraser].
Select the area to erase, and it will be erased. If you want to erase multiple layers at the same time, turn on [Erase All Layers] from the ⑤[Settings].
Special Pen: Copy Pen
“Copy Pen” can be used to copy part of a photo or illustration to another place. This tool is convenient to duplicate specific area, restore photos or to erase unneeded areas. In the example, a maple leaf is copied multiple times to make it look like a fallen leaves.
Open ①[Tool Select window] and tap②[Special Pen].
Open ③[Special Pen window] and select④[Copy Pen (Fixed)].
Move ⑤[Copy Area] to the place where you want to copy and adjust ⑥[Thickness] to change the size of the copy area. You can make copies by adjusting “Copy Zoom” and “Jitter Copy Angle” from the ⑦[Settings] as you like.
Filter (Adjust Color): Find Edges
With “Find Edges,” users can detect outlines of pictures and illustrations. For example this feature can be used to convert pictures to images showing outlines only, which can then be used to easily create manga backgrounds by applying screentones.
Open ①[Tool Select window] and choose ②[Filter].
Select ③[Adjust Color] and tap ④[Find Edges].
Set your algorithm, smoothness, black, white, and middle as you like and tap ⑤[✓] button.
Finally, add finishing touches to make your image look even more like a manga background by applying screentones or overlaying with a picture in grayscale.
Filter (Style): Emboss
“Emboss” can be used to apply an embossing effect (convex processing) to illustrations and photos. This is effective when used in text such as titles.
Open ①[Tool Select window] and select ②[Filter].
Select ③[Style] and tap④[Emboss].
Set Blur, Height and Amount as you like and tap ⑤[✓].
For the last, change blend mode to “Hard Light”. By reversing the lighting direction, you can also finish as debossed style (concave processing).
Filter (Style): Waterdrop (Rounded)
The “Waterdrop (Rounded)” filter applies an effect that looks like as if you dripped waterdrops on your illustration. This filter is useful when you want to draw something like raindrops on a glass by applying to drawing dots and lines.
Add a layer for drawing the raindrops and draw dots in random place and thickness of brush.
Open ①[Tool Select window] and select ②[Filter].
Select ③[Style] and tap ④[Waterdrop (Rounded)]. Set the Distance, Height and Flatness as you like and tap ⑤[✓]. If you apply the “wave” filter, you can make the raindrops looking natural even more.
It’s also interesting to apply this filter to text such as the title.
Filter (Draw): QR Codes
“QR Code” can be used to add QR Codes to illustrations and photographs. For example, you can increase your followers by adding QR Codes of your Social Media Accounts or Blog URL.
Open ①[Tool Select window] and select ②[Filter].
Select ③[Draw] and tap ④[QR Code].
Enter the URL for ⑤Social Media Accounts or your Blog and adjust the QR Code size and color as you like and tap ⑥[✓].
Adjust the place of the QR Code to finish.
Filter (Art): Chrome
“Chrome” give an illustration a shiny metal-like texture. Applying the filter to the text, you can make text that looks metal cut-out letters. For example, it is recommended and good to use when you want to create high-quality looking metallic letters for titles and logos.
Prepare white-boarded text. Open ①[Tool Select Window] and select ②[Filter].
Select ③[Artistic] and tap ④[Chrome].
Set details, smoothness and color as you like and tap ⑤[✓].
Follow the same steps to apply “Drop Shadow” to add background textures to create more realistic and high quality metallic text.
Exporting and Importing Brushes
It is now possible to export and import brushes. The exported brushes will be saved as QR Code images. By sending the QR Code image that you have saved by social media or email, you can easily share custom brushes with your friends.
Open ①[Brush window] and select ②[the brush to export]. From the ③[Menu], select ④[Export Brush QR Code].
The brush has been saved. Tap ⑤[OK] and close the dialogue window.
Since the brush can be exported as a QR Code such as the image above, you can share brushes with your friends by sending the QR Code image by social media or email.
Importing a brush is similar to exporting. From the ⑥[Menu] of Brush window, select ⑦[Import Brush QR Code].
Ver.7.1.0 New Features
17 New Kinds of Brushes
We’ve added 17 new and realistic types of brushes, including the [Acrylic], [Watercolor], [Flat Watercolor], [Gouache], and more that allow you to express yourself even more through your illustrations.
Acrylic (Opaque 2), Watercolor (Edge 2), Watercolor (Edge 3), Hard (Edge)
Watercolor (Mix 2), Watercolor (Opaque 2), Flat Watercolor (Mix 2), Flat Watercolor (Opaque 2)
Fade Watercolor (Opaque 2), Fluffy Watercolor (Mix 2), Fluffy Watercolor (Opaque 2), Transparent Watercolor (Mix 2)
Transparent Watercolor (Opaque 2), Gouache (Mix 2), Gouache (Opaque 2), Acrylic (Mix 2)
Filter: Extrude
Extrude (Parallel) and Extrude (Perspective) filters add depth to the illustrations and texts and make them look 3D. This is perfect for titles, character lines, sound effects, and much more.
Open ① [Tool Selection window], then select ② [Filter].
Tap ③ [Extrude (Perspective)].
Adjust Depth, Color, Smoothness, etc. as you like, then tap ④ [Done].
You can also add other texts and background images to make it look more 3D.
Ver.7.0.0 New Features
Layer Folders
Layers can now be organized with folders. For example, you can make it easier to see how the layers are placed and be able to organize and manage easier by separating each part such as hair, face, body, background, etc. into different folders.
Open ① [Layer window] > Tap ② [Add Special Layer] > Select ③ [Add Folder].
You can add layer to a folder by swiping ④ [Reorder Handle] to the right. To remove layer from a folder swipe [Reorder Handle] to the left.
Tap ⑤ [Thumbnail] to open and close the folder.
To reorder folders and layers, go to [Tool Selection window] > [Settings] > turn on ⑥ [Drag Left Side to Reorder Layers] and you’ll be able to reorder by dragging the left side of the layers as usual.
Filter: Relief
[Relief] will add a 3D effect to a layer. For example, you can apply it to a title text to make it pop out the screen with 3D effect.
Add new layer above the text layer. Go to ① [Tool Selection window] > tap ② [Filter].
Tap ③ [Relief]. Change Reference to ④ [Lower Layer] and adjust the parameters as you like then tap ⑤ [Done].
You can add more 3D effect by applying ⑥ [Drop Shadow] with the same procedure.
27 New Kinds of Brushes
We’ve added 27 new types of brushes such as the [Grass (Fern, Color)], [Grass (Green foxtail, Color)], [Grass (Sedge, Color)], [Leaves], [Chain (Color)] that are convenient for drawing the background in illustrations.
Grass (Fern, Color), Grass (Green foxtail, Color), Grass (Sedge, Color), Grass (Nutsedge, Color), Grass (Goosegrass, Color), Grass (Kentucky Bluegrass, Color), Grass (Luzula, Color)
Ver.6.4.0 New Features
4 New Kinds of Brushes
In this way, you can easily add [Three Strand Braids] to a character.
Ver.6.3.0 New Features
6 New Kinds of Brushes
We’ve added six new kinds of brushes, the [Hair Gloss 1] and [Hair Gloss 2] that’s convenient for drawing a character’s hair, and the [Sequin Pen], [Sequin Pen (Hexagon)], [Sequin Pen (Star)], [Sequin Pen (Heart)] that can express sparkling sequins.
Sequin Pen, Sequin Pen (Hexagon), Sequin Pen (Star)
Backup Settings
Settings for brushes and color palettes, etc. can now be saved as «backup files (ipcfg)». If you export and save the backup files to an external storage such as Dropbox, iCloud, an SD card, etc., you can easily restore your work environment until present from the backup files if you change devices, so it is really convenient. As an example, we will explain how to export a backup file to Dropbox.
Tap the ①[Settings] button on the Title screen.
Tap ②[Backup Settings]
Tap ③[Save to Dropbox].
Select ④[Save Location], and tap ⑤[Save].
Restore Settings
When changing devices, the “backup file (ipcfg)» that was previously exported to an external storage can be imported to ibisPaint, and by doing so, you can now restore your work environment. As an example, we will explain how to import a backup file from Dropbox to ibisPaint.
Tap the ①[Menu Button] of the backup file stored in Dropbox.
Tap ③[Copy to ibisPaint].
The app will automatically switch to ibisPaint, so turn ON the setting you want to import and tap ④[Done].
A [Confirmation alert] will be displayed, so just tap the ⑤[OK] button and the settings will be restored.
Ver.6.2.0 New Features
13 New Kinds of Brushes
We’ve added 13 different kinds of brushes for a variety of applications including the Rough Layout Pen, the Scribble Pen, the Japanese Calligraphy Pen, the Glitter Pen, the Prism Ring, and more. Prism brushes (Ring, Prism and Flash) are suitable for use with Circular or Elliptical ruler of the Ruler tool. You can easily express the glitter of jewelry such as crystals or diamonds with these brushes.
Rough Layout Pen (Blurring), Stylish Pen, Stylish Brush
Scribble Brush, Scribble Pen, Japanese Calligraphy (Blurring), Japanese Calligraphy
Fashionable Pen, Glitter Pen, Frizzily Pen
Prism Ring, Prism Piece, Prism Flash
Delete Multiple Works Simultaneously
You can now batch select and delete multiple works in My Gallery and Collection.
Tap or drag and select ②[The Works You Want to Delete], then tap on the ③[Trash] icon.
Tap ④[Delete] to delete all selected works.
Tap ⑤[Done] to finish.
Filter: Pixelate Crystalize
The [Pixelate Crystalize] filter applies a mosaic of crystals on a layer. For example, applying it to a character background can add an interesting finishing touch to your work.
Open the ①[Tool Selection window], select the ②[Filter].
Swipe over and select ③[Pixelate Crystalize].
Set your preferred parameters. Tap ④[Done] and use the filter.
Filter: Pointilize
The [Pointilize] filter applies a mosaic of stipples on a layer. For example, applying it to a character background can add an interesting finishing touch to your work.
Open the ①[Tool Selection window], select the ②[Filter].
Swipe over and select ③[Pointilize].
Set your preferred parameters. Tap ④[Done] and use the filter.
Filter: Dots (Hexagonal)
The [Dots (Hexagonal)] filter applies a mosaic of hexagonally arranged dots on a layer. Applying it to a character background can add an interesting finishing touch to your work.
Open the ①[Tool Selection window], select the ②[Filter].
Swipe over and select ③ [Dots (Hexagonal)].
Set your preferred parameters. Tap ④[Done] and use the filter.
Filter: Dots (Square)
The [Dots (Square)] filter applies a mosaic of lattice-arranged dots on a layer. Applying it to a character background can add an interesting finishing touch to your work.
Open the ①[Tool Selection window], select the ②[Filter].
Swipe over and select ③[Dots (Square)].
Set your preferred parameters. Tap ④[Done] and use the filter.
Ver.6.1.0 New Features
Filter: Blur Lens
The [Blur Lens] filter can blur a layer like a picture taken by a single-lens reflex camera. Although the filter has a variety of potential applications including character backgrounds, it is especially recommended for nighttime pictures and scenery where the lighting is an important factor. Since the [Lens Blur] can blur the sections with light into aesthetically pleasing hexagonal shapes, the filter is useful for adding a surreal quality to your works.
Open the ①[Tool Selection window], select the ②[Filter].
Swipe over and select ③[Lens Blur].
Set your preferred parameters. Tap ④[Done] and use the filter.
Filter: Hexagonal Pixelate
The [Hexagonal Pixelate] filter applies a mosaic of hexagons on a layer. Applying it to a character background can add an interesting finishing touch to your work.
Open the ①[Tool Selection window], select the ②[Filter].
Swipe over and select ③[Hexagonal Pixelate].
Set your preferred parameters. Tap ④[Done] and use the filter.
Filter: Square Pixelate
The [Square Pixelate] filter applies a mosaic of squares on a layer. Applying it to a character background can add an interesting finishing touch to your work.
Open the ①[Tool Selection window], select the ②[Filter].
Swipe over and select ③[Square Pixelate].
Set your preferred parameters. Tap ④[Done] and use the filter.
Filter: Triangular Pixelate
The [Triangular Pixelate] filter applies a mosaic of triangles on a layer. Applying it to a character background can add an interesting finishing touch to your work.
Open the ①[Tool Selection window], select the ②[Filter].
Swipe over and select ③[Triangular Pixelate].
Set your preferred parameters. Tap ④[Done] and use the filter.
Filter: Ripple
The [Ripple] filter applies a ripple effect on a layer like ripples on a surface of water. Depending on how you choose to use it, the feature can have a variety of creative applications.
Open the ①[Tool Selection window], select the ②[Filter].
Swipe over and select ③[Ripple].
Set your preferred parameters. Tap ④[Done] and use the filter.
Filter: Twirl
[Twirl] applies a whirlpool-like effect on a layer. Applying it to a character background can add an interesting finishing touch to your work.
Open the ①[Tool Selection window], select the ②[Filter].
Swipe over and select ③[Twirl].
Set your preferred parameters. Tap ④[Done] and use the filter.
Filter: Fisheye Lens
The [Fisheye Lens] filter applies a fisheye lens effect on a layer like a picture taken with single-lens reflex camera. Depending on how you choose to use it, the feature can have a variety of creative applications.
Open the ①[Tool Selection window], select the ②[Filter].
Swipe over and select ③[Fisheye Lens].
Set your preferred parameters. Tap ④[Done] and use the filter.
Filter: Polar Coordinates
The [Polar Coordinates] filter can transform an image into polar or rectangular coordinate system. For example, you could make a square texture circular. Depending on how you choose to use it, the feature can have a variety of creative applications.
Open the ①[Tool Selection window], select the ②[Filter].
Swipe over to select ③[Polar Coordinates] and tap ④[Done] to apply the filter.
Ver.6.0.0 New Features
Custom Brush
You can now freely change brush parameters and save them as «Custom Brush». You can also change the list position of «Custom Brush».
Tap ①[Brush] and open [Brush Window]. Tap ②[+] and add a Brush to [Custom Brush].
Set your parameter preferences and tap ④[<].
77 New Kinds of Brush Parameters
77 new kinds of brush parameters like «Blurring», «Jitter Color», «Brush Type», and «Texture» have been added, and you can now customize your brush settings even further.
«Watercolor (Mix)», «Watercolor (Water)», «Watercolor (Opaque)», «Flat Watercolor (Mix)», «Fade Watercolor (Mix)».
«Fluffy Watercolor (Mix)», «Transparent Watercolor (Mix)», «Gouache (Mix)», «Acrylic (Mix)», «Watercolor (Edge)».
«Crayon Mod»、»Soft Pastel Mod»、»Hard Pastel Mod»、»Oil Pastel»、»Pan Pastel».
«Outline», «Blurring Outline», «Light», «Neon 1», «Shadow Text».
170 New Kinds of Brushes
We’ve added 170 new kinds of brushes, including «Love Pen», «Technical Pen», «Fountain Pen», «Mechanical Pencil», «Colored Pencil», and more.
«Love Pen», «Ink Pen», «Technical Pen», «Drawing Pen», «Fountain Pen».
«Pencil Mod (#1)», «Pencil Mod (#2)», «Mechanical Pencil (#1)», «Mechanical Pencil (#2)», «Colored Pencil».
«Vertical Stripes», «Dashed Line», «Only Outline (Part)», «Diagonal Shadow Pen», «Blurring Brush 1», etc.
«Clouds (Real)», «Glitter Heart», «Flower Shower», «Moire 1», «Hatching Mod 1», etc.
5 New Types of Drawing Tools
«Circle», «Ellipse», «Regular Polygon», «Bezier Curve», and «Polyline» have been added to the Drawing Tools found in the «Stabilizer Window».
Tap ①[Stabilizer] to display the [Stabilizer Window]. ②[Circle], [Ellipse], [Regular Polygon], [Bezier Curve], and [Polyline] have been added.
Fill to Drawing Tool
We’ve added «Fill» to the «Stabilizer Window». Choose any of the options from «Circle», «Ellipse», «Regular Polygon», «Bezier Curve», and «Polyline» in the drawing tools, turn on «Fill», and now you can fill areas.
Tap ①[Stabilizer] to open the [Stabilizer Window]. Select ②[Circle], [Ellipse], [Regular Polygon], [Bezier Curve], and [Polyline]. Turn on ③[Fill] and select your fill color.
Gap Recognition
We’ve added «Gap Recognition» to the «Bucket» tool and the «Magic Wand» tool. By turning on «Gap Recognition», you can fill in areas where your lines aren’t connected without flowing over into other areas.
Tap ①[Tool] and select ②[Bucket].
Turn on ③[Gap Recognition].
④Tap the area you’d like to fill.
You can fill the space between unconnected lines.
Unpainted Recognition
We’ve added «Unpainted Recognition» to the «Bucket» tool and «Magic Wand» tool. It can produce better results than the old «Expansion» feature even for drawings of lines with varying thickness.
Tap ①[Tool] and select ②[Bucket].
Tap ③[Bucket] and turn on ④[Unpainted Recognition]. ⑤ [Expansion] becomes ineffective.
⑥Tap the area you’d like to fill.
It produces natural filling result even for drawings of lines with varying thickness.
Continuous Filling
We’ve added «Continuous Filling» to the «Bucket» tool and the «Magic Wand» tool. Turn on «Continuous Filling», swipe your finger across the canvas, and you can fill in different places as you do so.
Tap ①[Tool] and select ②[Bucket].
Tap ③[Bucket] and turn on ④[Continuous Filling].
⑤Swipe your finger across the spots you’d like to fill.
The areas you swipe will be filled.
Eraser Bucket Sub-tool
We’ve added the «Eraser Bucket» sub-tool to the «Bucket» tool. You can make colored spaces clear again by switching to the «Eraser Bucket» sub-tool and tapping the area you’d like to change.
Tap ①[Tool] and select ②[Bucket].
Select ③[Eraser Bucket].
④Tap the area you’d like to make transparent.
The area you tap will become transparent.
Export Photoshop File (PSD file)
You can now make PSD files. You can edit your works drawn with ibisPaint with an application that supports Photoshop or PSD files, or you can submit it as a manuscript to a printer.
Select ①[your artwork] you’d like to export as a PSD.
Tap ②[Share]Button and select ③[PSD (Preserved Layers)] or [PSD (Flattened Layer)].
Select the address you wish to share or save to.
Filter Tool UI Reform
We reformed the Filter Tool UI, and now it’s easier and more convenient to use.
Tap ①[Tool] and select ②[Filter].
Filters now have thumbnails, making their effects easier to understand.
You can also display by ③[Category].
Improved Filter Tools
The «Filter» tool has been improved. You can now apply filters to «Selection Layer» and you can save your filter parameter settings. With this, the next time you use a filter, you can use the same settings as before. Also, you can now choose between «Current Layer», «Upper Layer» and «Lower Layer» as reference layers for «Drop Shadow», «Stroke», «Glow» and other filters.
Example: Apply the Wave filter to the selected area
Example: Reference the [Upper Layer] and apply [Drop Shadow]
You can reset your saved preferences with ①[Return to Default Settings].
Reordering Artwork (A Prime feature)
You can now reorder your artwork in My Gallery and Collection. This function is for Prime users only.
Hold your finger down on the ①[artwork] you want to reorder.
Then drag it to where you want to move it.
New Filter: Unsharp Mask
Strengthen edged portions of a picture, and give your work a sharp feel. Useful when you want to represent metal, machines and other things, or when you want to put finishing touches on your work.
Tap ①[Tool] and select ②[Filter].
Swipe over and select ③[Unsharp Mask].
Set your preferred parameters. Tap ④[Done] and use the filter.
New Filter: Noise
Adds color or monochrome noise to your photo. Useful for when you want to add a rough feel to your pictures.
Tap ①[Tool] and select ②[Filter].
Swipe over and select ③[Noise].
Set your preferred parameters. Tap ④[Done] and use the filter.
New Filter: Glitch
Adds sideways block noise and color blur to your picture. Useful for when you want to add the effect of looking through a broken monitor to your picture.
Tap ①[Tool] and select ②[Filter].
Swipe over and select ③[Glitch].
Set your preferred parameters. Tap ④[Done] and use the filter.
New Filter: Bevel
Add thickness, highlights, and shadows to make your picture look like a 3D image. Useful for when you want to make things such as tin badges or game screen buttons.
Tap ①[Tool] and select ②[Filter].
Swipe over and select ③[Bevel].
Set your preferred parameters. Tap ④[Done] and use the filter.
New Filter: Frosted Glass
Applies noise to make your entire picture hazy. Useful for when you want to add the effect of looking at your picture through a piece of frosted glass.
Tap ①[Tool] and select ②[Filter].
Swipe over and select ③[Frosted Glass].
Set your preferred parameters. Tap ④[Done] and use the filter.
New Filter: Sheer
Applies noise to your picture in the form of shapes like crosses, lines, circles, squares, and hexagons. Useful for when you want to add a rough feel to your picture.
Tap ①[Tool] and select ②[Filter].
Swipe over and select ③[Sheer].
Set your preferred parameters. Tap ④[Done] and use the filter.
New Filter: Wave
Vertically or horizontally expand your picture to change it into a wave shape. You can apply some interesting effects to your picture by experimenting with various parameter settings.
Tap ①[Tool] and select ②[Filter].
Swipe over and select ③[Wave].
Set your preferred parameters. Tap ④[Done] and use the filter.
Title Screen and My Gallery Improvement
The Title Screen has been redesigned, and My Gallery has become easier and more convenient to use.