


Описание
Существа Сонарии-это WIP игры на выживание существ!
⇀Играйте за самых разных существ
Показать полностью.
⇀Расти и выживать в прекрасном мире
⇀Как играть: кровотечение/токсичные/танк/флаер/и т. д!
⇀Используйте захватывающие боевые способности
⇀Тусоваться и общаться с друзьями
⇀Объединяйтесь с другими и сражайтесь в команде
⇀Охота в огромной вселенной
⇀Сохраняйте, торгуйте и храните своих взрослых существ
⇀Гнездитесь в очаровательных младенцах и действуйте как их родитель, чтобы вырастить их!
⇀Выжить в различных сезонах, погоде и катастрофах
⇀Достигните совершеннолетия и мутируйте, чтобы стать еще сильнее
⇀Выживайте в суровых битвах и зарабатывайте постоянные боевые шрамы
Мы не являемся данными создателями этой игры!
Это группа для Русского комьюнити!
ভভভভভভভভভভভভভভভভভভভভভভভভভভভভভভভভভভভভভভভভভভ
Controls
Contents
PC Controls vs Mobile Controls:
PC Controls can usually be recalled and used faster (with the exception of a number of control overlaps), but have difficulty in precise scenarios such as the Tornado Escape minigame. In Contrast, Mobile is considerably better at precise interactions but has the caveat of being relatively difficult to use.
PC Controls
⚠️ Note: Function Keys
In this guide, you may see mentions of function keys (such as F5 ). Depending on your system, you may need to hold a key labeled Fn while pressing the corresponding function key (usually this only applies to laptops, desktops never really have this). On most laptops, the Fn key is located on the lower left or right side of the keyboard. For many laptops, it usually has a different color for the button itself or text on the button.
To name an example, on a Macbook Air, pressing F5 alone will turn your keyboard brightness down. You need to hold the Fn key in the lower right corner of your keyboard while pressing F5 for the game control to work (or to just use it normally, change the configuration via BIOS / UEFI).
Bindings
F5 (For PC)- switch between first person camera and third-person, and vice-versa. This is currently a prototype feature and will have a proper mobile button in the future. Mobile users can say /fp in chat, however this is obsolete and scheduled for removal after the button is added on screen.
— Free the cursor while using the first person camera.
— Toggle free cursor while using the first person camera.
Mouse Wheel Zoom in / out
Basic Action controls
NOTE: Sit, lay and submissive display are also the way to heal several negative ailments such as poison, necro-poison, bleed, ligament tearing, bone breaking, and burn. They’ll also reduce or outright stop Shro’s lamp effect of stacking poison. Of these methods, sitting is the least effective. Submissive display works due to an artifact in its code (namely, it sets the Laying state to true, so the game believes you are laying down).
Shift + F5 : Enable/Disable debug stats info.
Trading
Trading is a mechanic in Creatures of Sonaria that allows players to exchange items.
Contents
What to Trade
All game items can be traded within the Trade World. Players can offer species, stored versions of creatures, Shooms, Tokens, and [[Plushies]. Each item has its own purpose and value, so it’s important to understand the difference between them before participating in trades.
Shooms
Shooms ( ) are one of the game currencies alongside Tikits, however, Tikits are not tradable. Shooms are the most widely-accepted offer in the Trade World because it is the main game currency in Creatures of Sonaria.
In a trade, there is a limit of 12,000 per slot, for a max of 36,000 for all slots. This means the highest Shoom amount someone can offer in the Trading World would never exceed 36,000. It is only possible to exceed this limit by engaging in a Trust Trade, which is where the trade is spanned across multiple transactions. Trust Trades are extremely dangerous as the other person can leave the game and steal your side of the offer. It is not advised to perform these.
To offer Shooms, players must click on the top left of an active trade window, click «Coin amount,» enter a desired amount, and click «Confirm» to offer that amount in a trade.
Shooms are obtained by:
Species
A species allows a player to create unlimited stored versions of a creature, or ‘saves’. Species are guaranteed to appear in the «Find a creature!» section of the Main Menu after clicking «All Creatures» to view all of the species that a player owns (w). When trading, only one of a given species can be added to the trade at a time. That is, if I own three Ikoran species, I will only be able to add one of those three to the trade.
Information on the number of species of a certain creature that a player owns is available in the Main Menu on the left where tab buttons for Storage, Tokens, and Species appear. Clicking the ‘Species’ button will display all owned species and the number of copies of each species that a player owns.
A species will always stay in a player’s inventory unless they choose to either trade away or sell a species they own. If a player owns multiple copies and chooses to trade or sell a species, they will still own the species to create infinite copies in the game as long as they still have one species left. This makes having more than one of a given species useless for standard gameplay purposes, but very helpful for trade purposes. A good analogy to describe a species is that it’s a «factory» for the given kind of creature.
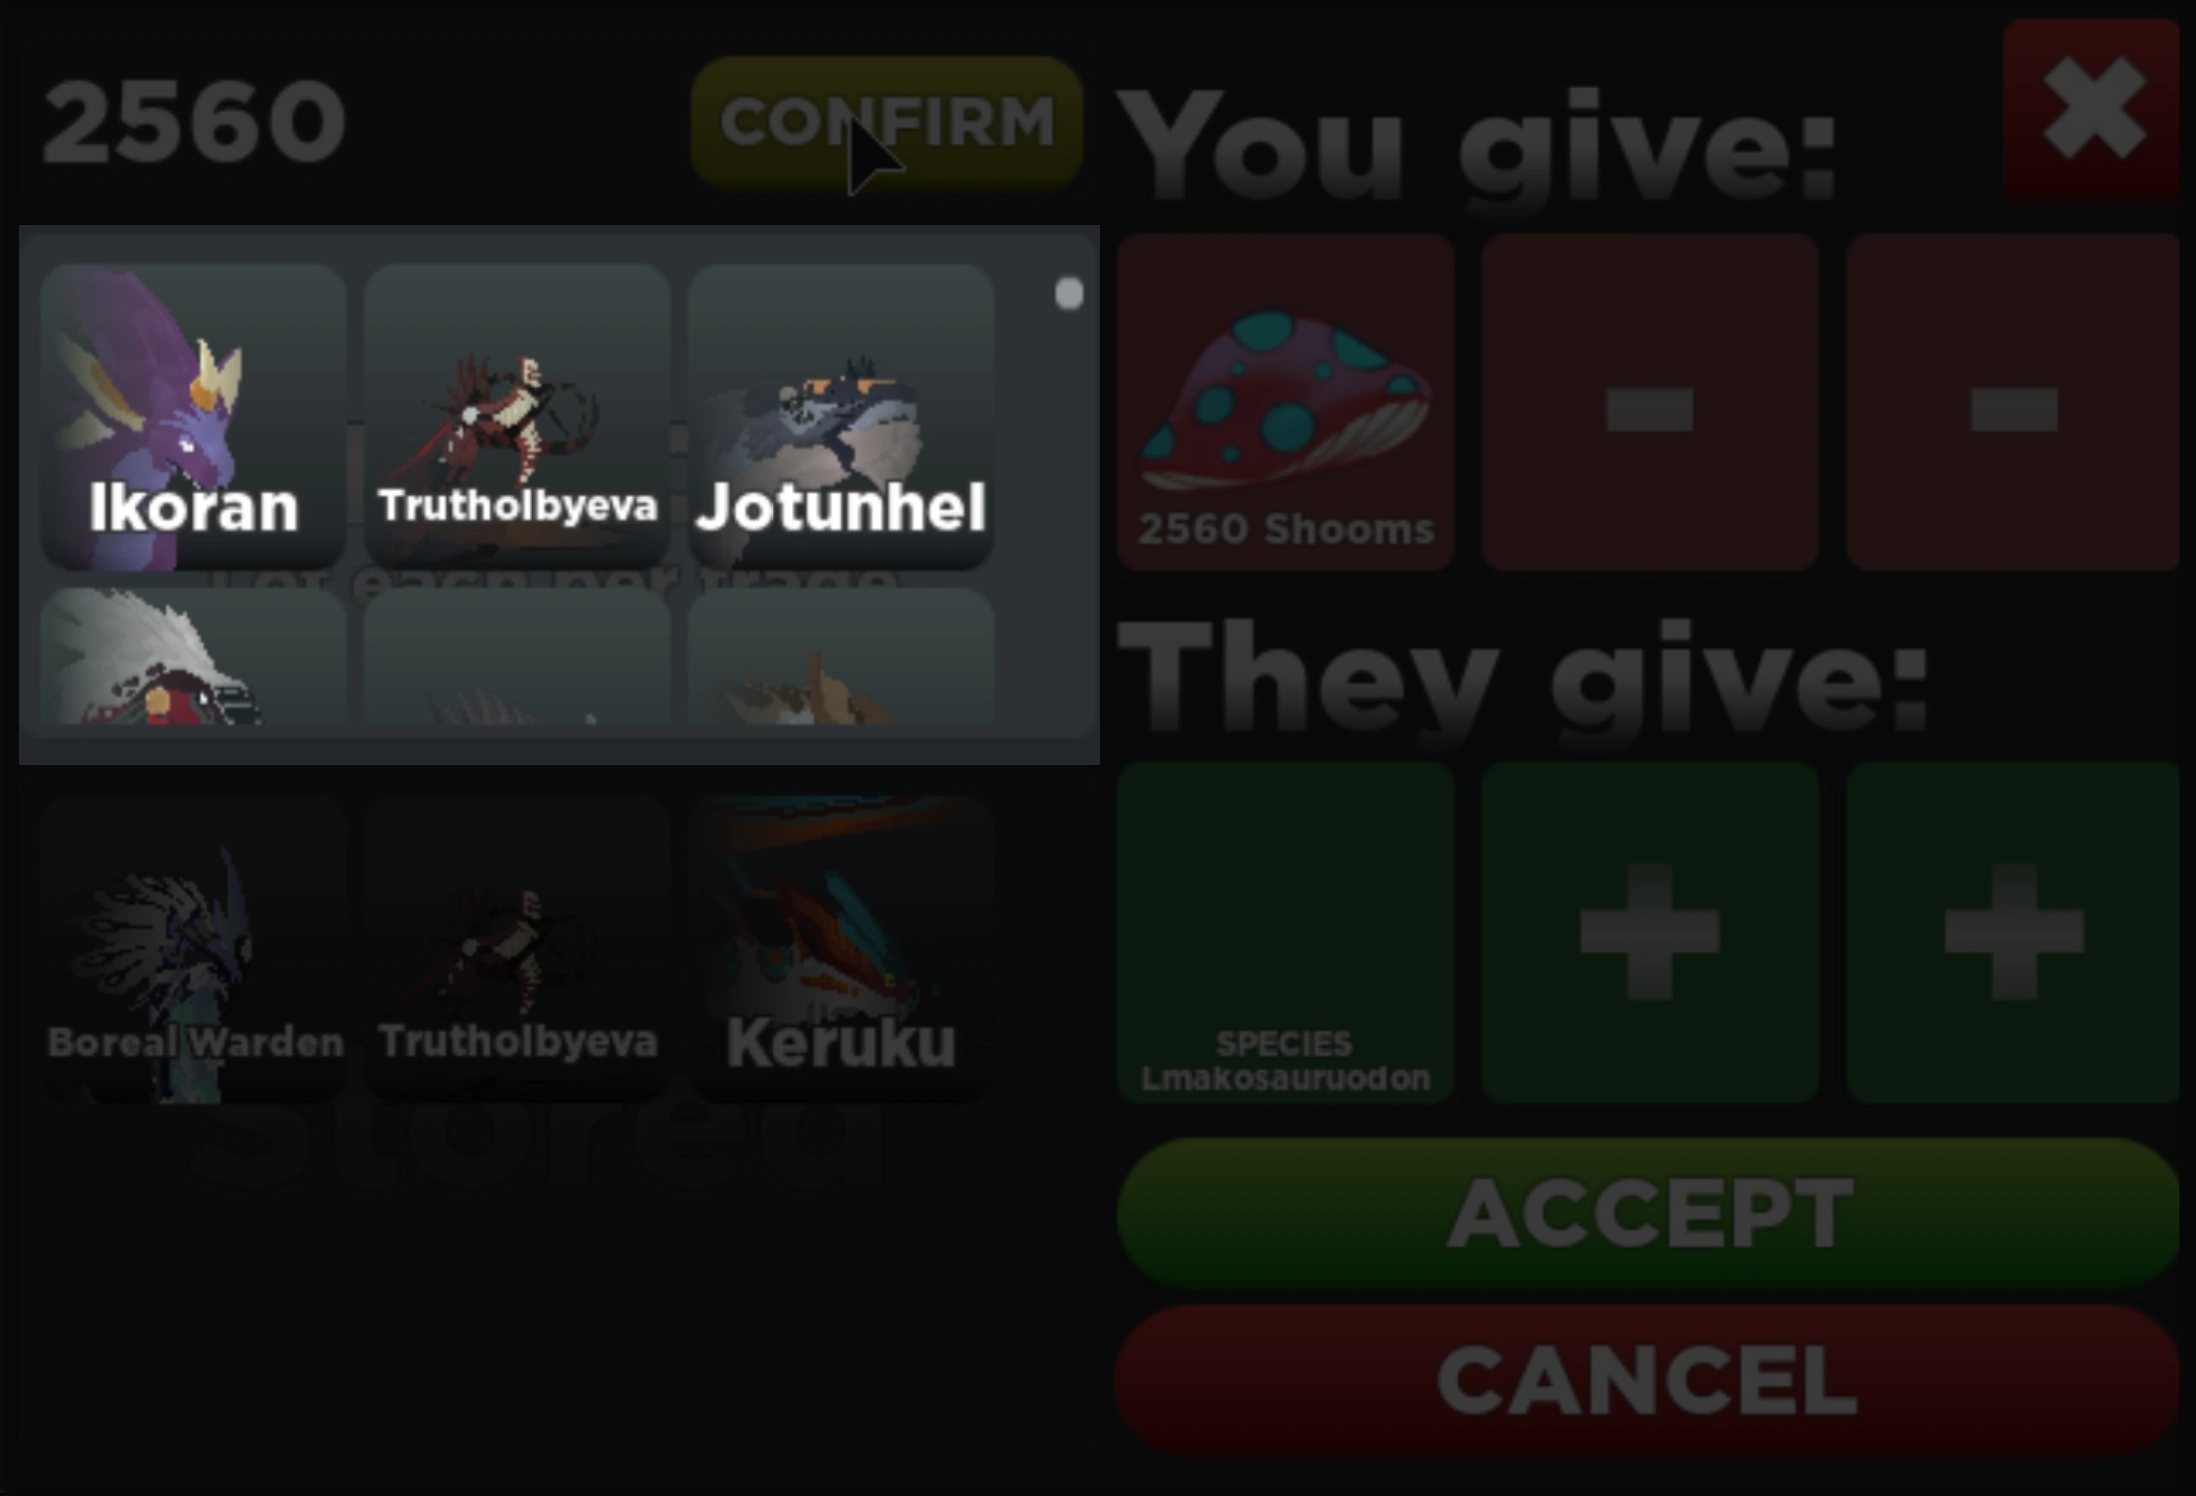
When trading, species will display with green text, prepending «Species» to the name. For instance, if someone adds a Buukon species to the trade, it will show with green text and specifically say Species Buukon. Hovering over the item will explain the purpose of a species.
Species are obtained through:
In the trade window, species can be found in the box just below the ‘coin amount’ area.
Stored
Stored versions of a creature can be thought of as an specific specimen, one-time use versions of a species. Owning a stored version of a creature allows a player to play as a species that they do not own. If a stored version of a creature dies, players can choose to revive it using the Revive Token. All stored versions will appear under Creatures or in the Storage on the Main Menu. A storage slot is best compared to a «save slot» in that it is a single creature that already has progression.
When viewing Stored Creatures, a number of attributes will display when hovering your mouse over them:
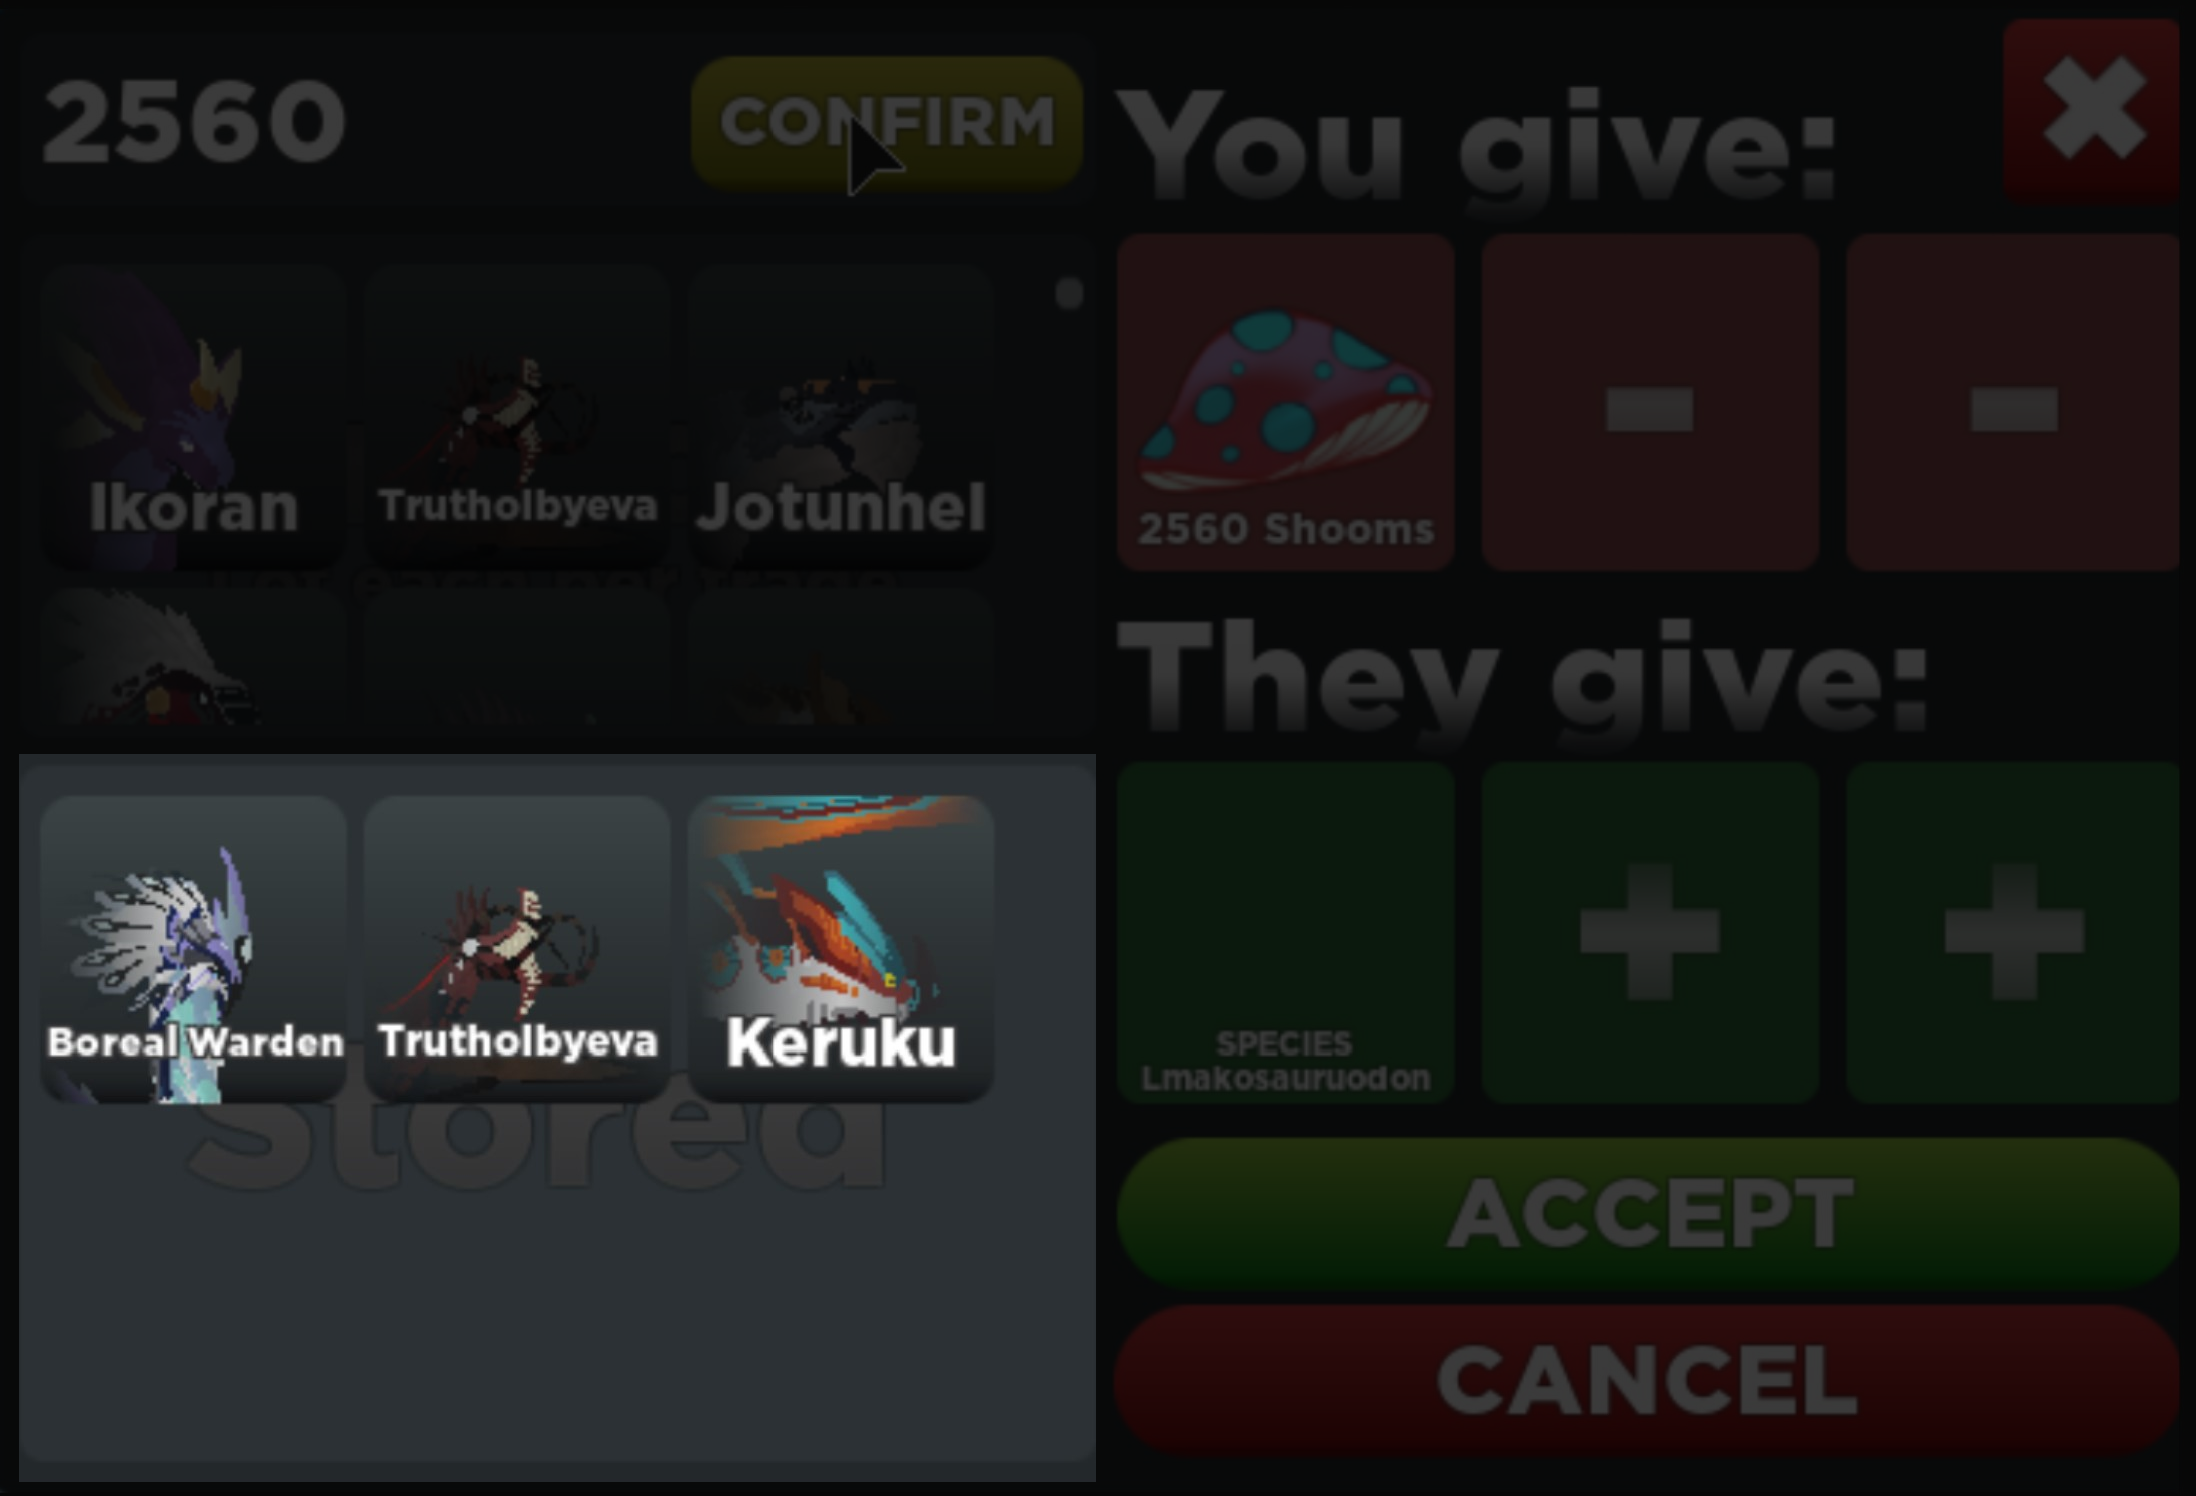
To contrast them from species, stored creatures display in white text and are always prepended with Stored before their name.
Stored versions are obtained through:
Tokens
Tokens are game items that can be consumed to modify the attributes of a creature, or to redeem some game item or items. They see a wide array of use. Similarly to Species trades, only one of a given token type can be added to the trade at a time, even if the trader owns more than one of that token.
Plushies
Plushies are a feature that is only seen in the trade realm. Plushies are small creatures which can be equipped or traded, and serve no functional purpose at this time. They are mostly intended for loose collector’s value, but are in low demand due to lack of function. These also function like Tokens in trade in that only one of a given type of plushie can be added at a time, regardless of how many of that type the trader owns.
How to Trade
The Trade Realm
Players cannot trade in the main game and must instead go to the Trade Realm, a separate game which can be accessed by clicking the button labeled ‘TRADE WORLD’ in the bottom left of the main game’s menu. Once in the Trade Realm, players can begin trading.
Trade Realm servers are locked/limited by regions (Examples: US, Asia, Europe), but you are able to trade with someone who is operating from a different region than you as long as you are friends. If the region you are trading from is Europe (essentially meaning you live there) you cannot trade with a non-friend from the US. VPNs (Virtual Private Networks) normally allow you to establish connection in different regions than yours. This is why many people ask if you have a VPN, since it can allow trading between different people in different regions when you cannot friend them for one reason or another.
The realm itself can be split into 5 different areas, those being the main plaza at the center and the 4 towers that surround it. As of right now, 2 of these 4 towers have special requirements needed in order to access them (owning ≥10 creatures or having ≥250 Shrooms respectively) which can be used to filter trade offers.
The species inventory
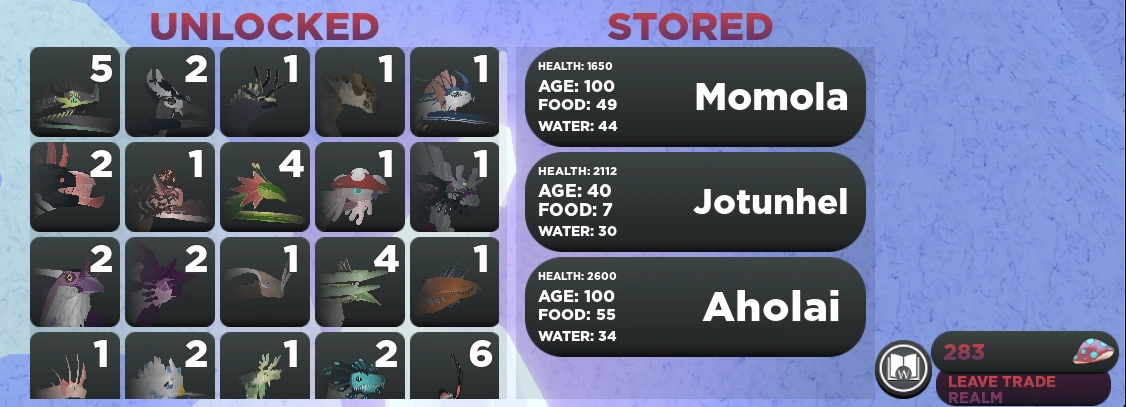
Checking Inventory
In order to check what creatures a player has, they can access their ‘inventory’ by clicking/tapping the book icon in the bottom right of the screen. This will bring up an alphabetically ordered list of all the species a player owns, how many of them they have, as well a list of their stored creatures.
While this list is open, players can click the icons under the ‘unlocked’ section to say they are “Trading [Creature Name]!”. This can be useful for a quick broadcast and keeping chat clear, but is less useful for more specific trades.
Starting Trades
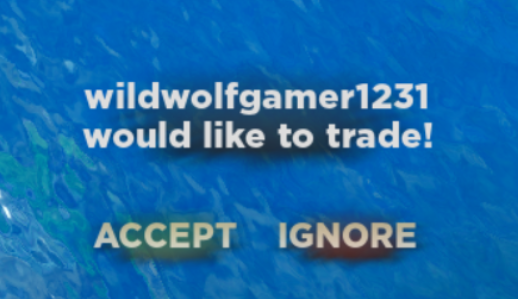
To initiate a trade, players must walk up to another player and press E or click on the player when a prompt to do so appears over their avatar (the only way on mobile). This will send them a prompt to accept or decline the trade. If they accept, as long as the other is not in a trade, the trade menu will appear (or even change if you are in a trade menu, but this is not advised since it can lead to buggy behaviour), but if they decline nothing will happen. Similarly, if a player asks another player to trade, a message at the bottom right corner of their screen will appear asking them to accept or decline. Accepting will bring up the trade menu, and declining will remove the offer.

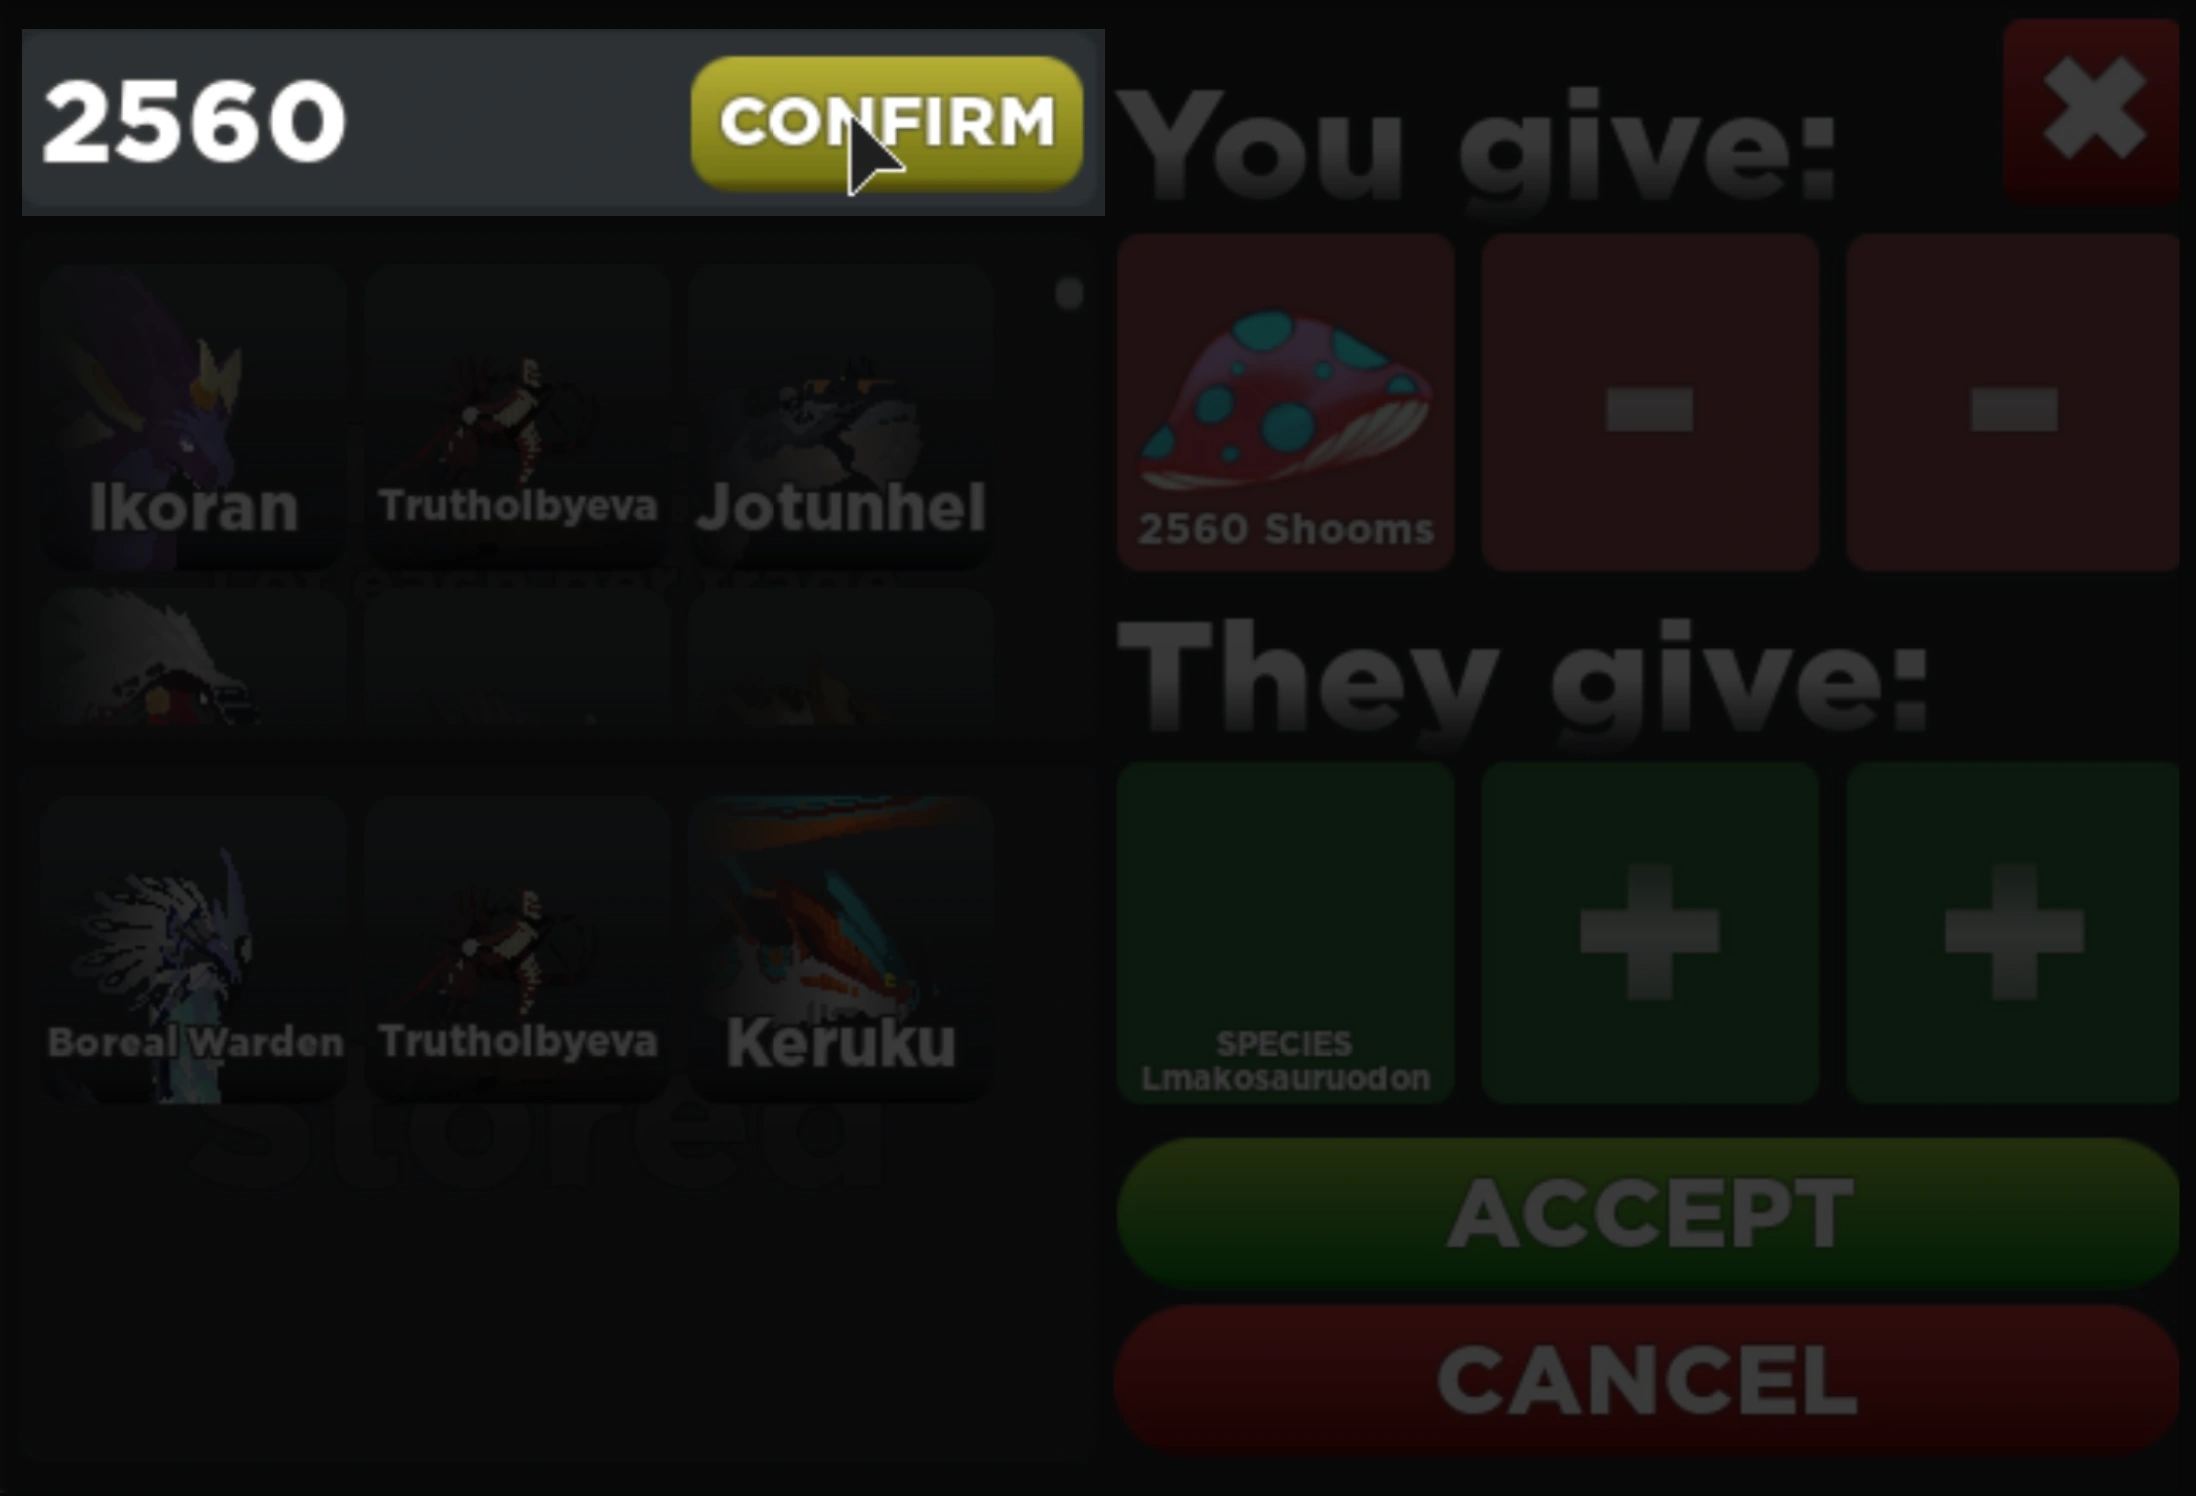
The Trade Menu
There are 2 main parts of the Trade Menu:
Once a player has finished adding what items they want to trade, the trade will be finalized when both parties hit the submit button. Keep in mind that trades can be canceled if one party accepts and hits the accept button again (or decides to cancel or re-add items after accepting), exits out of the menu, or crashes before the trade is complete.
Countering Scammers
With the implementation of Trade V2, an update done by Eti in an attempt to both improve trading and to entirely remove all previous system exploits, a number of utilities have been added to trades. Some of these have been mentioned above. Among these countermeasures are:
At the moment due to how Roblox translation system works in COS, non-English speakers must be careful of another type of scammer: the incorrect name scammer. Those use the mistranslation errors to their advantage, usually the «Trading K» mistranslation bug, which transforms the name of every species which starts with «K» to just «K», to deceive new players into believing they are trading one species when in fact they aren’t. For example:
The best measures to counter these scammers are changing your Roblox Settings in menu to switch your language to English. and having access to the wiki (official creatures page being a good start) and Discord for a reference in what a creature looks like and costs.
Gacha
Gachas are the primary way to obtain new creatures, besides trading for them. Gacha is short for gachapon, which are capsule-toy vending machines popular in Japan, similar to loot boxes.
In order to access the Gachas,
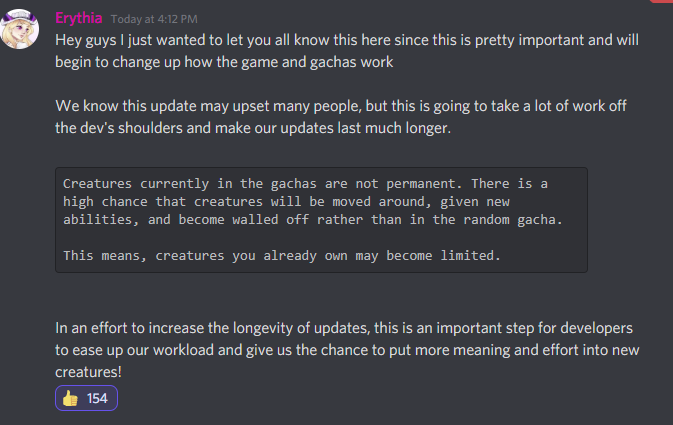
*Note: as of 6/15/21, Erythia has announced in the Discord that Gacha creatures have a very high chance of being moved around, in order to take a lot of work off the devs’ shoulders. This means Gacha creatures that are «worthless» as of now may become limited in the near future.*
Contents
Main Gachas
These gachas are available year-round, and contain the majority of the game’s creatures.
Diet Gachas
(See also: Diet Gacha Drops)
These gachas are the first gachas the player sees in the ‘Buy Creatures’ menu after the Random Gachas. These gachas sort creatures by what kinds of food they can eat. This category includes the following gachas:
Type Gachas
(See also: Type Gacha Drops)
Gachas that sort creatures by type (ex. flying, aquatic, semi-aquatic). Each gacha sorts creatures based on what environment the creature can live in. The only creature type that is not included in this gacha type are terrestrial (grounded) creatures. This category includes the following gachas:
Status Effect Gacha
(See also: Status Effect Gacha Drops)
Gachas that sort creatures based on what kind of status they inflict when biting/getting bit other creatures, such as poison or bleed. Each gacha in this category costs 350 Shooms. This category includes the following gachas:
Session Gacha
The Session Gacha is a unique gacha that can only be spun once the player as completed a certain set of tasks. Once the player completes these tasks, the gacha will be unlocked and can be rolled for 500 Shooms. Once the player rolls the gacha, the gacha will lock back up, unlocking when the player completes the gacha tasks again. The tasks are as follows:
The creatures in this gacha are as follows:
Time Gacha
The Time Gacha is a feature that can be unlocked by playing the game for a certain amount of hours. The more hours you play, the more Time Currency a player can accumulate to buy high tier Time Gachas. Time Currency will subtract itself from the total amount of time played each time a player rolls a Time Gacha. It may be accessed by clicking on the «TIME GACHA» button.
The Time Gacha is technically several smaller gachas, but each gacha contains only 1 creature, guaranteeing the player’s desired drop. The Time Gacha contains the following creatures:
| Time | Creature Tiers | Creature Name |
|---|---|---|
| 30 Minutes | Tier 1 | Yiepir |
| 2 Hours | Tier 3 | Aesho |
| 10 Hours | Tier 4 | Verklixin |
| 50 Hours | Tier 4 | Kohikii |
| 100 Hours | Tier 5 | Yeba’idi |
| 250 Hours | Tier 5 | Hellion Warden |
Robux Gacha
Instead of using an in-game currency to spin, Robux Gachas require Robux to spin. Creatures in this gacha follow a common design theme, much like the creatures within the Limited Gachas. As of right now, the Robux Gacha costs 150 Robux to spin, and it currently contains the following creatures:
Time Sensitive Gachas
These gachas contain creatures which may not be available during all parts of the year, and may cycle through creatures as time goes on.
Limited Gacha
(See also: Limited Gacha Drops)
The Limited Gacha contains usually 2 creatures at a time whose designs follow a certain theme. These 2 creatures stay in the Limited Gacha for a period of time before they are cycled out for another set of 2 creatures. In order to be able to roll this gacha, the player must have 55 unique species of creatures unlocked. The previous and current gacha themes are as follows:
Event Gachas
(See also: Event Gacha Drops) Event Gachas are gachas that become available according to real life holidays. Creatures that feature in an event gacha return as the gacha itself returns, alongside some new additions. The event gachas are as follows:
Trivia
Random Gacha
On October 1st, 2021, the Random Gacha was removed from the game. This gacha was the largest pool of creatures, as it contained about every creature so long as they were not limited, time-related, Robux (or in Session Gacha). It was the cheapest gacha to roll at 35 Shooms per roll.
This gacha contains every creature except for the following (click [Expand]):
Secret (Mission) Creatures
Mission Reward creatures are creatures that do not appear in any Gachas until a task is completed while following certain requirements. Missions are unique to each Mission Reward creature, and the difficulty of obtaining them may vary. Once a mission is completed, a notification will appear on the bottom right of the screen.
Currently, the other known Mission Reward creatures aside from the official ones listed below, are the Avothious and Auraron.
Contents
Mission Creatures
This section is intended to provide detailed information about each Mission Reward creature’s mission, including any tips or clarifications deemed necessary.
Arsonos
To unlock the Arsonos in gachas, players must collect the Rare Scale that drops during a Volcanic Eruption. The scale may temporarily appear as a Tall Shoom until the model of the scale is applied.
Astrothi
To unlock the Astrothi in gachas, players must choose a flier and nest other players at night during the Winter or Autumn seasons.
Militrua
To unlock the Militrua in gachas, players must eat the equivalent of 300 food from underwater palm trees as a semi-aquatic herbivore in one session without going to the menu or leaving the game.
To quickly use up food, choose a male and create a Food Storage. Dump all food into the storage, destroy the food storage, retrieve more food, and repeat until the mission is complete.
Vaumora
To unlock the Vaumora in gachas, players must be a Tier 3 and above flyer and must lose 30% of their max health from any Elemental Breath during any extreme weather event (Windstorms, Eruptions, Tornado, etc.)
Zethines
To unlock the Zethines in gachas, players must become a herbivore and heal off 250+ bleed in one session.
To speed up the process, stay close to mud spots to wallow in by pressing N which can improve bleed heal rates. Consider choosing creatures with generally low bleed resistance (30% or below) and decent heal rates (5% or more).